

Add rate-plan entries to selected channel room types and connect them to your property's standard rate plans where needed.
Before you start
- Open the correct property's Channel Settings page for the channel you want to configure. From Accounts, you can open a channel by clicking its name beneath that property.
- You need permission to edit Channel Settings to save. Ask your organization administrator if the form is disabled. Demonstration accounts cannot save these settings.
- Have the channel's confirmed rate-plan names and IDs, the intended room types, and any required channel-specific settings ready. Do not guess IDs or reuse an ID across rooms unless the channel uses it for those rooms.
- The channel room types must already be present. If you use standard rate plans, create them at property level before selecting their mappings here.
- Check the existing rate plans first. This screen adds entries; it is not an editor for existing plans. If the channel settings show Add Unmapped Rate Plans, that is a separate workflow for importing plans already identified in the channel's mappings.
Saving has consequences beyond filling in a form. Save stores the new plans in ChannelRUSH and, for channels that support it, can also send channel settings. That send can include existing settings, not only your new plans. Updating Enabled = No does not prevent a settings send and is not a stop-sell instruction.
Add the plans
- On Channel Settings, confirm the property and channel. Open Menu and choose Add Rate Plans.
- Under Room Types, select the channel room types that should receive the new plans. Each label identifies the property's standard room type followed by the channel room name and ID. Virtual room types are identified separately when present.
- In Rate Plan 1, enter the Name and Channel Rate Plan ID supplied for that channel.
- Set Updating Enabled deliberately. It starts at Yes. Choose No if inventory updates must remain disabled for the new plan while you finish its setup.
- If Standard Rate Plan Mapping is shown, select the corresponding property standard rate plan. Leave it blank only when that is the intended mapping for your setup.
- Complete any additional required channel-specific fields shown for the plan. Use the channel's supplied values. If you do not know a field's meaning or expected value, stop and confirm with support before saving.
- Fill further numbered sections as needed, up to Rate Plan 10. Leave both Name and Channel Rate Plan ID empty in every unused section.
- Review the room selection and every populated plan section, then click Save once. The Save buttons at the top and bottom submit the same form.
Every populated plan section is added to every selected room type. There is no separate room selection for each section. If different rooms require different plan IDs, mappings or settings, add them in separate batches with only the appropriate rooms selected.
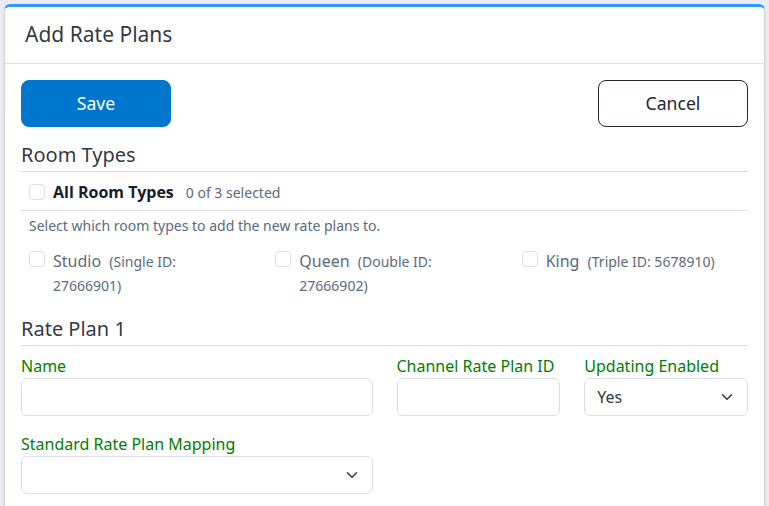
Example from a demonstration property. Further numbered plan sections continue below; the available rooms, standard plans and extra fields depend on your setup.
Selection and cancellation
- All Room Types selects or clears the room choices in the group. Check the selected count and individual choices before saving. No rooms are selected on a fresh form.
- Cancel returns to the same channel's settings without submitting this form. It does not undo a previous Save. If a leave-page warning appears after you edit fields, stay on the page unless you intend to discard those unsaved entries.
- Entering values or selecting rooms does not itself submit this form. You must click Save to add the plans.
Check the result
After a completed Save, you return to Channel Settings. The confirmation says that a number of rate plans have been added and saved for a number of room types. The plan count is the number of populated plan sections, not the total number of entries across all selected rooms.
- Review all messages, including any settings-send error alongside the saved confirmation.
- Locate each selected room type and check the new plans' names, channel IDs, Updating Enabled values and Standard Rate Plan Mapping selections.
- Look for [NOT SETUP], [INVALID MAPPING] or other configuration warnings. Do not start updates until the intended mappings and required settings are confirmed. Do not rely on this form to reject every incomplete or duplicate entry.
- If a settings send failed, or the page timed out, inspect the channel settings before adding anything again. The plans may already be saved. Contact support if you cannot establish what completed.
Saved in ChannelRUSH is not the same as accepted by the channel. A saved confirmation does not prove that the channel created a sellable plan, received rates or availability, or opened it for booking. Even a settings-send success message is not a general confirmation of those outcomes. Complete the channel's setup checks before beginning inventory updates.
Field reference
Room Types
Select the destinations for the entire batch. The standard room name helps you recognize the property room; the accompanying channel name and ID identify its mapping. A blank or unexpected channel mapping needs investigation before adding plans. Selecting a virtual room type adds entries to that virtual room type, not automatically to its parent.
Name
The display name for the new channel plan, for example Flexible. Start with the channel's supplied name so you can recognize it during setup. The name does not replace the channel ID used for mapping.
A completely unused section must have both its name and channel ID empty. An incomplete section with only one of them filled can still be processed; do not use partially completed sections as drafts when saving the rest.
Channel Rate Plan ID
The channel's identifier for this plan within the selected room types. Copy the confirmed identifier exactly, including any leading zeros or letters. It is not the property's standard rate-plan ID. A wrong ID can associate updates with the wrong plan or leave the plan incorrectly mapped.
Check that the same ID is valid for every room selected in this batch. This form does not offer a different ID for each selected room.
Updating Enabled
Yes allows inventory updating for the plan when the other channel, room and setup requirements are met. No disables ordinary inventory updating for that plan. The initial value is Yes in every numbered section.
This is not a command to close sales on the channel. It also does not suppress the channel-settings send that Save can perform. Setting it to No is therefore not a way to make an uncertain settings submission safe.
Standard Rate Plan Mapping
Select an existing property standard rate plan to associate with this channel plan. This allows updates directed to that standard plan to select the corresponding channel plans.
The initial choice is blank. Blank leaves the plan without a named standard rate-plan mapping; it does not mean that all inventory updating is disabled. Room-level updates can still reach eligible plans. The control is absent when the property has no standard rate plans. Choosing an option here does not create or rename a property standard rate plan.
Additional channel-specific fields
Some channels show extra settings beneath each plan, using text, numeric, single-choice or multiple-choice controls. These values apply to that plan in every selected room. For a multiple-choice control, retain every value required by the channel.
Use the exact choices or values required for your connection. If a required setting is missing from the form, do not assume a default or repeatedly add the plan to fix it. Ask support how that channel's setup must be completed.
Common problems
“No rate plan names have been entered.”
No section contains a usable entry for the form to process. Enter the confirmed name and channel ID in at least one section, check the room selection, and save. Do not enter only an ID to bypass the message.
“No room types have been selected.”
The form has a plan entry but no selected destination room. Select the intended room types, recheck all populated sections, and save. If the required room is missing, return to Channel Settings and have its room mapping completed first.
The form is disabled or saving is refused
Your account may lack Channel Settings editing permission, or you may be using a demonstration account. Ask your organization administrator to confirm your access. Do not use another person's login or try a broader administrative route to bypass the restriction.
A plan is saved but shows a setup or mapping warning
Its identifiers or required settings may be incomplete or inconsistent with the channel. Review the existing entry and confirm the channel's values. Adding the same plan again is not a repair. Contact support if the correct mapping or required setting is unclear.
A settings-send error appears, or the result is uncertain
Local saving and sending settings are separate steps. A send failure does not undo the saved plans. Reload the channel settings, check for the new entries, and collect the message before asking support to investigate. Do not repeat Save merely because an error appeared; a repeat submission can add duplicate entries.
The standard mapping choice is missing or the required plan is not listed
The list comes from this property's standard rate plans. Check that you selected the correct property and that the required standard plan exists. Ask your organization administrator to complete the property setup rather than mapping to an unrelated plan.
When contacting support, provide the property, channel, affected room and plan names/IDs, action time with time zone, and the exact error text. Do not send passwords, payment details or guest information.