

Connect the correct property, rooms and rate plans, then choose how inventory and reservations move between ChannelRUSH, your online travel agencies (OTAs) and your property management system (PMS).
This guide covers the shared Channel Settings page. An OTA connection sends rates, availability and restrictions out to a sales channel. A PMS Inventory Receive connection brings inventory into ChannelRUSH. Reservation delivery has its own controls and can run in the opposite direction.
The fields shown depend on the selected connection, its supported features and your permissions. The examples use Expedia and Viewpoint PMS; use your own provider's identifiers and agreed connection settings, not the example values.
Before you start
- Select the correct organization and property. Confirm the channel name at the top of the editor before changing anything.
- You need Channel Settings permission to save. The login section requires the separate Channel Settings - Login Info permission. You may be asked to verify your password before opening the page.
- Have the provider-confirmed property ID, room IDs, rate-plan IDs and connection details. A familiar room name does not prove that its ID is correct.
- Confirm who controls rates, allocation and restrictions: your PMS, manual ChannelRUSH updates, or a combination using overrides.
- Agree changes to credentials, reservation delivery, pricing model or inventory source with your implementation contact before saving. These can interrupt an active connection.
Saving is an operational change, not a preview. It can refresh mappings from a supported provider, save the configuration and send mappings/settings to a supported provider. It can also notify connection monitoring; turning reservation handling off can notify support. Do not save merely to inspect a field or obtain a fresh screenshot.
Open the connection
- Select your property in the property selector.
- Open Admin → Settings - CM.
- In Channel Manager → Channels, select the OTA or the entry marked [PMS].
- Confirm the channel name and ID at the top of Channel Settings.
- Use Additional Settings within the property, room or rate-plan section to reveal its optional controls. Expand All and Collapse All change the display; they do not save the form.

Help opens this shared guide. Channel Support opens provider-specific instructions when available. Mappings opens the channel mapping comparison in another tab. Login, when shown, opens the provider's extranet; it does not save this form.
Configure the connection in a safe order
1. Check the shared connection details
Review Username, Password and Channel Property ID against the provider's setup instructions. If API URL appears, verify the approved endpoint as well. Do not replace an established connection login with your personal extranet login unless the provider requires that change.
Use Notes for non-sensitive operational context. Do not paste passwords, payment details or guest information into notes or support screenshots. Additional username/password fields are protected login information; use them only as directed for your connection.
Choose Channel Currency to match the currency configured for this connection. Confirm any conversion requirements before changing it. Rounding Setting controls rounding used in rate processing; it is not a currency selector.

2. Check every room mapping
Each room card is headed by the property's standard room type. Inside that card:
- Set Channel Room Type Name to a recognizable description of the provider's room.
- Enter the provider's exact Channel Room Type ID. The ID, not the display name, establishes the external mapping.
- Where shown, check OccupancyMin and OccupancyMax against the provider's occupancy pricing setup.
- On an OTA, review that room's Updating Enabled and its supported feature controls.
- Repeat for every room you intend to manage.
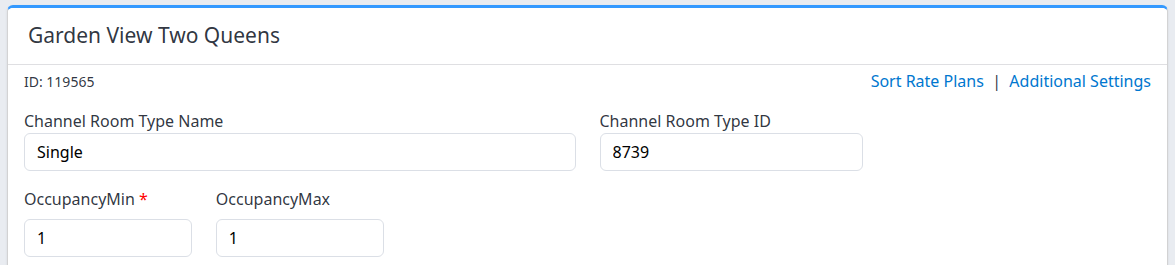
PMS example: the standard room is Garden View Two Queens; the provider-facing room name and ID are separate fields. These demo mappings are examples of the form, not recommended mappings for your property.
An OTA room header can also show PMS: name (ID) or PMS: [UNMAPPED]. This is a reference to the associated PMS room mapping, not a field that you edit on the OTA card. If it is unexpected, check the PMS connection and any inventory-group assignment before changing the OTA ID.
3. Check the rate plans under each room
- Find the intended rate plan under the correct room card.
- Review Rate Plan Name and enter the external Channel Rate Plan ID.
- Select the corresponding Standard Rate Plan Mapping, where available.
- On an OTA, review the rate plan's Updating Enabled, feature controls and rate calculations.
- Repeat for each room/rate-plan combination. Do not assume a rate-plan ID is interchangeable between rooms.
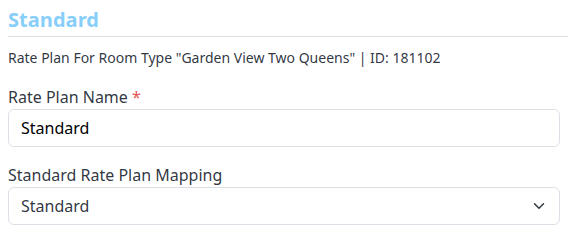

A blank Standard Rate Plan Mapping leaves that selection unassigned; it does not automatically choose a standard plan. For a PMS receive connection, avoid assigning multiple incoming rate plans under the same room to the same standard rate plan: duplicate standard mappings can prevent saving.
4. Apply the OTA or PMS controls below
Review the appropriate section before saving. Updating Enabled, Inventory Receive and Reservation Handling are different switches; enabling one does not enable the others.
OTA: control inventory sent to the sales channel
Updating Enabled and feature groups
An OTA can have Updating Enabled at connection, room and rate-plan level. No disables inventory updating at that scope. Yes permits it, subject to the channel being available, the product being set up, and the relevant feature controls. A room or rate-plan switch is not a reservation-delivery switch.
Under Additional Settings, distinguish these groups:
| Group | What it controls | When unchecked |
|---|---|---|
| Standard Features - On/Off | Whether a supported inventory feature is enabled for this product. | That feature is disabled for the product's updating workflow. Checking another group does not override this master feature switch. |
| Standard Features - On/Off - Populate | Automatic population from broader controls on manual update screens. | A broader manual edit does not automatically populate this product's feature. A permitted channel-specific edit may still be available. This is not the PMS switch. |
| Standard Features - On/Off - PMS | Whether PMS-generated inventory can update this OTA product's feature. | The PMS-generated path does not apply that feature to this OTA product. This does not switch off the entire PMS connection. |
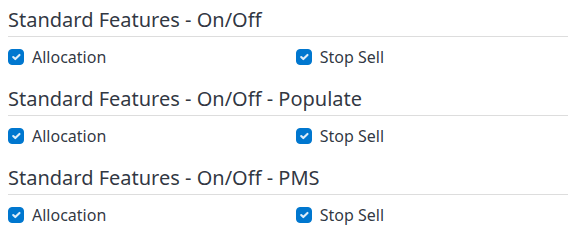
Room-level example: Allocation and Stop Sell have separate On/Off, Populate and PMS controls.
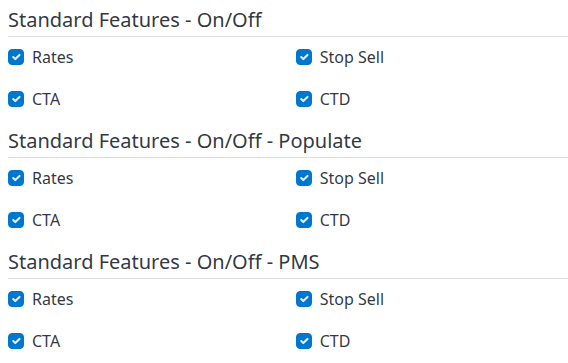
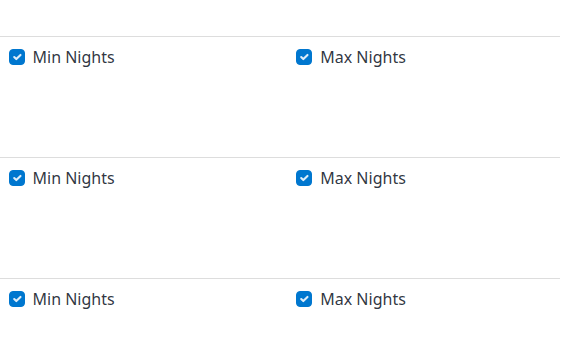
Rate-plan groups continue across the page. The right-hand screenshot shows Min Nights and Max Nights in the same top-to-bottom order: On/Off, Populate, PMS.
The available features vary by provider and by level. Expedia's room-level allocation controls and rate-plan restrictions are not a template for every other channel. Review both levels rather than assuming a checkbox on one controls every field on the other.
Net, sell, markup and margin
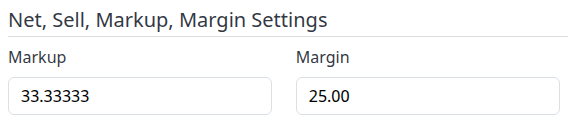
Net, Sell, Markup, Margin Settings appears only for supported OTA connections. Use the pricing model agreed with that provider; do not use this section as a general substitute for product rate calculations.

| Field | How to use it |
|---|---|
| Markup | The adjustment used to calculate the sell/net relationship. With % Percentage, markup is measured against the net amount. |
| Margin | The corresponding percentage of the selling amount. Changing a percentage markup or margin updates the companion value on screen. They are not two independent percentage additions. |
| Type | % Percentage uses a percentage. $ Flat Fee, or the displayed currency equivalent, uses an amount. The margin control is hidden for flat-fee calculation. |
| Minimum Markup Dollars | A minimum monetary markup for the supported net/sell calculation. Use only if required by the connection's pricing agreement. |
| Per Date Range | Lists dated markup settings. Add New opens a separate date-range editor; existing entries are maintained separately from this form. Save or discard pending work here before leaving for that editor. |
For illustration, a net amount of 80 with a 25% markup gives a selling amount of 100. The corresponding margin is 20%, not 25%. Confirm whether the provider expects net or sell rates before applying either figure.
Provider-specific Additional Settings
These controls are not universal. Required fields carry an asterisk, and provider-supplied mapping differences may be highlighted.

For the Expedia example:
- RateAcquisitionType offers NetRate and SellRate. Choose the acquisition basis configured for your property with Expedia.
- Rate Type offers PerDay, PerOccupancy and PerPerson. Match Expedia's pricing setup rather than choosing whichever makes an individual rate look correct.
Other providers can have different required property, room and rate-plan parameters. Use Channel Support and the provider's confirmed mapping details. Do not copy Expedia's selections into a different connection.
PMS: receive inventory and protect selected manual updates
Inventory Receive modes

| Inventory Receive | Effect |
|---|---|
| Off | Disables receiving/storing inventory through the connection's enabled receive workflow. The page warns that inventory will not be received/stored. |
| On | Processes incoming inventory and creates automatic outbound channel updates for eligible mapped destinations. It does not guarantee those destinations accept the updates. |
| On - Queued | Stores the incoming inventory changes without automatically creating outbound channel updates in that receive-processing path. Do not treat this as normal automatic distribution with a promised delay. |
| On - Delta Only | Processes incoming inventory and generates updates while suppressing unchanged product/date snapshots. It is not a promise that every outgoing request contains only individually changed fields; a changed day can include existing values populated into that day's snapshot. |
Do not turn a second PMS source On without checking inventory groups. If another active inventory-receive source already exists outside the required group configuration, saving can be refused. Resolve the source-to-destination design rather than disabling the existing source to bypass the warning.
Connection Monitoring and receive timestamp

- Connection Monitoring enables or disables the connection's inactivity monitoring setting.
- Connection Monitoring Hours is an inactivity threshold in hours, not how often the PMS is polled. Monitoring also has eligibility and system checks; setting a number is not a guarantee of an alert at exactly that elapsed time.
- Inventory Receive Timestamp is informational. For a push receive connection it comes from the latest recorded inbound inventory-message creation time. For a monitored/pull connection it comes from the inventory monitor's recorded activity. A dash means no corresponding timestamp is available.
The timestamp is not proof that a particular room/date was updated or that an OTA accepted its inventory. Use it as a starting point for investigation, together with PMS ARI Log and outbound Updates Status.
User PMS Override
The User PMS Override section determines which types of saved manual updates can take precedence over later PMS inventory for the affected products and dates.

- Checked: an existing applicable manual override can block replacement by the corresponding PMS field.
- Unchecked: that override protection is not enabled for the field; later PMS inventory can overwrite manual values.
- Checking a box does not create an override value. A manual value must also have been saved for the relevant product/date through the update workflow.
Stop Sell has a special rule. Protection applies to a saved manual closure, Stop Sell = Yes. It can also prevent positive PMS allocation from reopening that closure. Do not assume a saved manual reopening, Stop Sell = No, is protected against a later PMS closure in the same way.
Review each field independently: Allocation, CTA, CTD, Cut Off Days, Max Nights, Max Nights Through, Min Nights, Min Nights Through, Rates and Stop Sell. Decide which system should own each value before changing these switches. Unchecking a switch does not by itself establish that a new PMS value has arrived or been sent onward.
PMS product sections can also show Standard Features - On/Off and rate calculations. Their supported fields relate to that PMS connection. The OTA-only Populate and PMS groups are not the same as this property-level override policy.
Reservation controls: separate from inventory
For an OTA, Reservation Handling concerns reservations received from that channel. For a PMS delivery connection, it concerns reservations delivered to the PMS. The property-level reservation configuration and the provider's capabilities must also support the intended flow.

| Field | Meaning and precautions |
|---|---|
| Reservation Handling | On enables the connection's supported reservation workflow; Off disables it. Turning OTA inventory updating off is not a substitute for turning reservation handling off. Coordinate changes with support/provider, especially when stopping delivery. |
| Reservation Send Type | Shown when both delivery methods are supported. Push sends through the provider's push integration. Pickup / Confirm uses the pickup/confirmation integration. Match the receiving system's setup. |
| Reservations - Send Email Notifications | A separate On/Off option shown for connections supporting this email override. Email notification is not confirmation of PMS delivery. |
| Reservation Retry | Enables or disables the PMS connection's automatic reservation retry setting. It is not a manual resend button and does not prove a failed reservation has been delivered. |
| Reservation CC Info | Controls the payment-card information prepared for the supported PMS delivery. Select the least information required by the approved integration. Token options require an appropriate token-capable setup. |
| Guest Messaging | Connection-level On/Off control when the feature, property and permissions make it available. It is separate from inventory and reservation handling. |
| Guest Reviews | Connection-level On/Off control when the review feature is available. Its absence is not a room-mapping error. |
Reservation CC Info options
- Off: removes the card number, security code and expiry from the PMS-bound reservation preparation. Do not interpret this as deleting every card-related field or the original reservation.
- On: does not apply that stripping/abbreviation step; the actual information available still depends on the reservation and integration.
- On - Abbreviated: keeps only the last four characters of the card number, removes the security code and retains expiry information.
- On - CC Token Only: uses the token workflow and strips raw number, security code and expiry from the PMS-bound preparation.
- On - CC Token - Abbreviated: uses the token workflow with abbreviated card details.
Never include card numbers, security codes, tokens or connection passwords in a support request or screenshot.
Shared field reference
Identity, scope and required values
| Field or indicator | Reference |
|---|---|
| Username / Password | Provider connection credentials. Required markers are not proof that the credentials have been accepted remotely. Keep established managed connection values unless instructed to replace them. |
| Channel Property ID | The provider's property identifier. It is distinct from the ChannelRUSH property ID in the property selector. Preserve significant characters and remove accidental leading/trailing spaces. |
| Extra Username 1 / 2; Extra Password 1 / 2 | Additional login fields shown with the login-info permission. Use only according to the connection's requirements; do not use them as general notes. |
| API URL | Provider-specific endpoint where supported. Editable with login-info permission; it can be shown read-only otherwise. A wrong endpoint can direct connection traffic incorrectly. |
| Notes | Notes about this property's selected connection. Keep them non-sensitive. |
| Channel Room Type Name / Rate Plan Name | Descriptive local labels for the channel products. Editing a label does not substitute for correcting its external ID. |
| Channel Room Type ID / Channel Rate Plan ID | Exact external product identifiers. A rate plan belongs to its displayed room context. Blank or incorrect IDs can leave the product not set up or wrongly mapped. |
| Standard Rate Plan Mapping | Associates the connection product with a property standard rate plan. A blank selection is unassigned. Some channels expose this at room level instead of rate-plan level. |
| OccupancyMin / OccupancyMax | Occupancy bounds used for occupancy-based rate setup where supported. Match the provider. On this form a blank minimum is read as 1, while a blank maximum is unset; neither means “copy the provider's current value.” |
| Occupancy Room Rate Mapping | Appears for applicable occupancy-based PMS mappings. Identifies the occupancy used for that mapping; agree it with the PMS setup rather than guessing from the room name. |
| [NOT SETUP] | The product lacks an external ID or has not met setup requirements. Saving a display name alone does not establish setup. |
| [INVALID MAPPING] | The external product ID was not found in the available channel mapping data. Review the provider and mapping comparison before replacing the ID. |
| [ X ] / INCORRECT SETTING - Correct: … | A difference against available channel mapping information. Inspect the specific field; this is not a confirmation that a send failed or that automatic replacement is safe. |
Inventory feature names
These checkboxes enable or route a feature; they do not enter a nightly value themselves.
| Feature | Inventory value it concerns |
|---|---|
| Rates | The product's monetary rate. Occupancy/additional-rate settings may have their own controls. |
| Allocation | Rooms or units available for sale. |
| Stop Sell | Whether selling is closed. |
| CTA / CTD | Closed to arrival / closed to departure. |
| Min Nights / Max Nights | Minimum / maximum length-of-stay restrictions for the supported channel model. |
| Min Nights Through / Max Nights Through | Stay-through length-of-stay restrictions, where supported, rather than assuming the arrival-based fields cover the same rule. |
| Cut Off Days | The supported advance-booking cutoff. |
| Additional Features - On/Off | Provider-specific inventory features. Follow their displayed names and channel instructions. |
A Property Level Standard Features - On/Off group can appear for providers that support property-level fields. Room and rate-plan feature groups apply to their displayed product. Do not infer that every provider exposes or interprets every feature at all three levels.
Currency, rounding and rate calculations
| Control | Reference |
|---|---|
| Channel Currency | Currency configured for the connection. Do not assume every integration or incoming amount is automatically converted merely because this field is selected. |
| Rounding Setting: Do Nothing | No rounding by this setting. |
| Round To Nearest Dollar / Round Up / Round Down | Round to the nearest whole monetary unit, upward, or downward respectively where this rounding setting is used. The displayed label can say “Dollar” even when another currency is selected. |
| Rate Settings — Calculation 1 through 6 | Ordered product-level adjustments. Each has an amount and a percentage/flat-fee type. Use zero for an unused adjustment; blank numeric calculation inputs are read as zero when that calculation is saved. |
| Rate Settings - [occupancy/additional rate] | Separate controls for the displayed occupancy or additional-rate component, where supported. Its On/Off and available Populate/PMS controls belong to that component, not every rate in the room. |
Calculations are sequential, so order matters. For example, 100 increased by 10% and then by a flat 5 becomes 115. Review the full chain, including other property or channel calculations, before adding a second adjustment. Saving configuration is not a command to resend every previously distributed date.
Save and check the result
- Review the entire connection, including expanded room and rate-plan settings. The top and bottom save controls submit the same form, not only the nearest card.
- Choose Save & Refresh from the arrow beside Save if you want to remain in this editor for verification. Save normally returns to the originating administration page after an existing connection saves without warnings/errors. If warnings remain, the editor can stay open.
- Read all success, warning and error messages. A settings-saved message and a settings-send result describe different stages.
- Reopen or refresh the saved editor and verify the intended IDs, modes, feature switches and calculations.
- Where supported, open Mappings and review the provider comparison. A successful local save is not proof that the provider accepted the mapping/settings send.
- For inventory delivery, open Menu → Updates Status. Select the intended outbound OTA destination and relevant dates, then click Search. If you opened this from the PMS editor, change the channel filter from the PMS to the destination you are checking. Inspect the actual request and its result; an empty result or a receive timestamp is not proof of delivery.
- For PMS inventory, also inspect Admin → PMS ARI Log for incoming messages. For reservations, use Menu → Reservations - Delivery Status and its Search action to investigate delivery separately.
Cancel leaves this editor without submitting the pending form. It does not undo a previous save or any downstream work already triggered. A new connection may instead show Save & Continue so that setup can continue after its first save.
If a save reports an error after configuration was saved, do not assume everything was rolled back. Reopen the connection and inspect the current values and status before repeating an action. Do not resend inventory or reservations solely to test whether a setting worked.
Common problems and safe next actions
| Symptom | Check and safe next action |
|---|---|
| This channel is not set up or [NOT SETUP] | Check the required connection/product fields and provider-specific Additional Settings. Verify external IDs with the provider. Ask support if correct confirmed values still leave setup incomplete. |
| [INVALID MAPPING], UNMAPPED ROOM TYPES or a mapping difference | Compare the saved IDs with Mappings and the provider's actual inventory. Mapping data may not contain the expected product. Do not change IDs based on names alone or bulk-import blindly. |
| Duplicate room/rate-plan mapping error | Check repeated external IDs and PMS standard-rate-plan assignments. A duplicate can involve another property. Ask support to resolve ownership if the error identifies a property you cannot inspect. |
| A second PMS cannot be enabled | Review inventory-group membership and which source feeds which channels. Do not switch off an established source merely to make the new one save. |
| Virtual room type cannot be saved for PMS | Inventory-receive connections do not allow virtual room types. The presence of Add Virtual Room Type in navigation is not proof that the selected PMS supports it. |
| No automatic OTA updates from PMS | Check Inventory Receive is not Off or On - Queued, then inspect mappings, OTA Updating Enabled, supported feature/PMS switches, override values and request status. Avoid changing several controls at once. |
| Manual values are replaced by PMS | Check the applicable User PMS Override switch and whether an override value was saved for those exact products/dates. Apply the special Stop Sell rule rather than assuming all Yes/No values behave identically. |
| Manual close does not reopen after PMS allocation arrives | A protected manual Stop Sell closure can block reopening. Review the saved closure and override policy before changing inventory. |
| Reservation warning although Updating Enabled is Yes | Inventory and reservations are independent. Check Reservation Handling and property-level reservation configuration. Coordinate any delivery shutdown with the provider/support. |
| Settings saved but settings send failed | Reopen to confirm local persistence, record the message and investigate the provider connection. A second save can repeat remote work; confirm the safe retry with support. |
| Missing or disabled controls | Check edit/login-info permissions, provider capabilities and property feature availability. Do not use another channel's settings as a workaround. |
| Unexpected rates | Check currency, pricing model, rounding, net/sell settings, all ordered calculations and the exact product mapping. Compare the generated request before changing prices again. |
When escalating, provide the property name/ID, channel name, affected room/rate-plan IDs, stay dates if relevant, action time and time zone, and the exact warning/error. Exclude passwords, payment details and unnecessary guest information.