

Upload and organize a property's photo files, check which files have photo mappings, and avoid removing images that are still in use.
Photo File Manager manages the uploaded files. A photo mapping places a file in a property, room, add-on or venue gallery. Uploading or copying a file does not create those placements.
Before you start
- Select the correct property. This is its file library, not Org Photo File Manager.
- You need Content permission to upload, rename, move or delete files. Without it, the page is view-only: you can browse, open and download files.
- The demonstration login cannot change photos, even when an editing control is visible.
- Keep your original files outside ChannelRUSH before replacing or deleting anything.
There is no final page-wide Save. Each file operation is separate. Choosing files in Upload starts uploading automatically; confirming a rename or deletion, or pasting a cut/copied file, performs that operation. Leaving the page afterward does not undo completed changes.
Open the property library
- Select the property in the property selector.
- Open Admin in the top navigation.
- Choose Home.
- Find the CRS, Booking Engine, Content section.
- Open Photo File Manager.
The folder tree and breadcrumb identify the current location. The library's top folder can be displayed as the property's numeric ID.
Find and inspect a photo
- Open the folder containing the photo.
- Enter part of its filename in Search. The file list updates as you type.
- Clear Search to remove that search filter.
- Select the photo. The toolbar changes to show actions for the selection; right-clicking the photo opens its action menu.
- Choose Open to inspect the image, Details to inspect its file information, or Download to save a copy to your computer.
Details shows the item's type, size, location and modified date. It describes the file, not its delivery status. Use Refresh to reload the listing. Sort by changes the file order, and View changes how files are displayed; neither sets the order of photos in a customer-facing gallery.
Understand the Mapped badge
- Mapped means one live photo mapping refers to that file.
- Mapped ×6, for example, means six photo mappings refer to the file. These can be different galleries or content profiles; it does not mean six channels received it.
- A folder's N mapped count includes mappings to files in its subfolders.
- No badge means no counted live photo mapping was returned for that item. It is not a general audit of every place the image may be used.
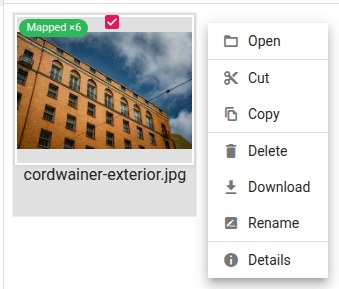
The badge describes photo mappings. The menu acts on the uploaded file, not only one gallery placement.
Upload new photos
- Open the destination folder.
- Click Upload.
- Choose the files on your computer. Uploading begins automatically.
- Check each file's upload result. Do not treat a failed item as uploaded because other items succeeded.
- Use Refresh and find the uploaded filenames in the destination folder.
- Open each new image to check that it is the intended photo.
Accepted extensions are .jpg, .jpeg, .png, .gif, .webp, .avif, .svg, .ico, .tif and .tiff. The limit is 50 MB per file. HEIC and BMP are not accepted upload types. Export an unsupported image to an accepted format before uploading; renaming its extension does not convert the image.
A file appearing in this library confirms file storage, not publication on a booking website or channel. To use it in a gallery, return to Admin → Settings - CRS → Content - Photos and add the required photo mapping. See Photo Mappings in the CRS guide for the separate upload-and-map workflow. Do not use a bulk mapping action unless all of its selected placements are intended.
When the filename already exists
Check the destination folder and existing image before choosing what to do:
- Replace overwrites the existing file at that location. Existing mappings retain that file reference, so the replacement can affect every property, room, add-on and venue mapping using it across the property's content profiles. Choose it only when all those uses should receive the new image.
- Keep both retains the existing file and adds a separate copy. Check the resulting filename, then map the new file where needed. Existing mappings are not transferred to it.
Replacement requests a refresh of the mapped copies; the file-manager result does not establish that every website or booking channel already displays the new image. Check the affected destinations separately.
The upload dialog's remove control is not a rollback of Replace. It can remove an unused upload, but a mapped file is protected from that removal. Do not use it to try to restore the previous image.
Organize files and folders
Create a folder
- Open the parent folder.
- Click New folder.
- Enter the folder name and confirm the dialog.
- Check that the new folder appears, then open it before uploading into it.
Rename a file or folder
- Select the item.
- Choose Rename.
- Enter the new name and confirm the dialog. Keep a photo's existing extension unless you have a specific reason to change it; renaming is not format conversion.
- Refresh the listing and check the new name.
- If the item was mapped, check the affected photo mappings and images too.
A successful rename updates matching photo-mapping paths across the selected property's content profiles. Renaming a folder also updates matching paths beneath it. This is not limited to one gallery.
Move or copy within the property library
- Select the items to organize. Check the selected-item count before proceeding.
- Choose Cut to move them or Copy to make additional files.
- Open the destination folder.
- Choose Paste.
- Check the destination listing. For a move, also check that the items no longer appear in the original folder.
A successful move updates the existing matching photo-mapping paths. A copy does not duplicate or redirect photo mappings. Map the copy separately if you want to use it.
Drag-and-drop is also available with Content permission. Use Cut or Copy, then Paste, when you need an explicit choice between moving and copying. Do not use a copy/overwrite operation as a substitute for the mapped-image Upload → Replace workflow.
Delete files safely
Delete removes the uploaded file and its matching photo mappings across the property's content profiles. Deleting a folder includes files and mappings beneath it. This is broader than removing a photo from one gallery.
If you only want to remove one placement, use that gallery's mapping controls instead of deleting the underlying file. If you want to change its text, use Edit a property's photo text.
- Check the selected property and folder.
- Download a backup of any file you may need again.
- Select only the files or folders you intend to remove.
- Review their Mapped badges and the selected-item count.
- Choose Delete.
- Read the confirmation, including any mapped-photo warning. Cancel if the scope is broader than intended.
- Confirm only when removal of those files and their mappings is intended.
- Refresh the listing and inspect the affected galleries and destinations.
Do not rely on an undo or recycle-bin recovery from this screen. Re-uploading a deleted file is not proof that its previous photo mappings have been restored.
Check the result
Check the result at each relevant level:
- Files: refresh the correct folder and verify the expected name, location and image. After an error, inspect both original and destination folders before trying again.
- Photo mappings: inspect the affected property, room, add-on or venue gallery. Check the relevant content profiles, not only the first one you open.
- Website or channel: inspect the actual destination. File storage, a mapping badge and a refreshed preview are not channel-acceptance indicators.
File changes and mapping updates are separate steps. An error after a rename, move, replacement or deletion does not guarantee that nothing changed. Stop and reconcile the file and mappings before repeating a destructive operation.
Control reference
| Control | Purpose and important distinction |
|---|---|
| Folder tree and breadcrumb | Choose the location within the selected property's library. |
| Search | Find files by name; clear the search before concluding a file is absent. |
| New folder | Create a folder in the current location. |
| Upload | Select files for immediate upload; check individual results and duplicate-name choices. |
| Sort by | Change listing order, not gallery display order. |
| Refresh | Reload the current file listing; does not resend content. |
| View | Switch the file-list presentation. |
| Open | Inspect a file or open a folder. |
| Details | Inspect file information such as size, location and modification date. |
| Download | Save a local copy; does not create another gallery mapping. |
| Cut / Copy / Paste | Move existing files or create copies in a destination folder. Copies need separate mappings. |
| Rename | Change an item's name and update matching mapping paths on success. |
| Delete | Remove files and matching mappings, including descendants of a deleted folder. |
| Selection count | Shows how many items the current action will address. Check it before a bulk operation. |
Common problems
Editing controls are missing or changes are refused. Check whether the page says it is view-only. Ask your administrator to check your Content permission. The demonstration login cannot change photos; do not interpret visible buttons as permission to submit changes.
“No property is selected. Reload the page and try again.” Return to the application, select the intended property and reopen Photo File Manager from Admin. Contact support if the error continues with the correct property selected.
An upload is rejected. Check its extension and the 50 MB per-file limit. Convert or resize the original as necessary, then check the destination for any files already uploaded before retrying only the missing or failed items. Contact support if a valid file continues to fail; retain the exact error text.
A file seems to be missing. Clear Search, check the folder tree and property, then use Refresh. If an operation failed, inspect the source and destination locations. Do not recreate or delete mappings until you know where the file is.
A photo is uploaded but absent from a gallery. Uploading does not create a mapping. Check the gallery's photo mappings and selected content profile. If the mapping exists but the image is unavailable, contact support rather than deleting and recreating it repeatedly.
A replaced photo still looks old elsewhere. First verify the new file in this library, then the affected mapping and destination. A refresh request is not proof of completed publication. Give support the property, filename and folder, affected website or channel, action time and time zone, and any error text. Do not repeat replacement or delete the file as a repair attempt.
An operation reports an error after the file appears changed. Stop further changes. Check the file listing and mappings and provide support with the operation, old and new locations, time and error. A repeated operation can compound a partially completed change.