

Use this review after room types, rate plans or connection settings change on a channel. The goal is to match the correct channel IDs to your ChannelRUSH rooms and plans, keep the intended update settings, and remove only mappings that are genuinely obsolete.
Before you start
Open the correct property's Admin page, then the relevant channel's settings. Check the property and channel names before making changes. Editing, adding and deleting mappings requires Channel Settings permission; connection credentials require the separate Channel Settings - Login Info permission.
If you arrived here from a Missing Room Type Mappings alert, check the property, channel and reported room ID against the current settings and mapping information. No new items in the list is not enough to dismiss the alert; resolve missing or uncertain data with support.
Finish or discard any unsaved edits before navigating away or reloading. Note the affected room/rate IDs and any custom settings you need to retain. Do not change credentials or enable updating just to clear a warning.
1. Load and check the mapping information
Click Mappings at the top of Channel Settings. It opens in a new tab.

For channels that support retrieval, opening this page requests mapping information and can update ChannelRUSH's saved mapping list. Other integrations use saved or manually supplied mappings, or show the mappings prepared for a PMS. This is not a universal, read-only refresh, and you should not assume Booking.com or Expedia has already refreshed every change automatically.
- Check the property, channel and Channel Property ID shown on the mapping page.
- Read any Mapping Error banner before relying on the results. An error, empty channel list or unexpected missing room/plan is a reason to investigate—not to delete mappings.
- Review Mapped Room Types, Unmapped Room Types and, where available, All [channel name] Mappings. Compare room and rate-plan IDs, not names alone. Check the detailed rows as well as Issues Requiring Attention.
Mapped, zero Errors or zero Warnings do not prove a successful fresh retrieval. The page can show locally mapped rooms and zero issue counts alongside a separate Mapping Error. Likewise, no Mappings Updated! banner does not necessarily mean retrieval failed: the returned information may be unchanged.

Banner from a demo comparison using saved mapping data. The same page showed locally mapped rooms and zero issue counts; this example does not demonstrate a fresh provider retrieval.
If the result is unexpected, confirm the connection/property ID with an authorized administrator and compare the affected IDs with the channel's extranet. Contact ChannelRUSH support if retrieval fails or the lists disagree. Do not treat an old saved list as confirmation that a plan was removed remotely.
Mappings - Other, when available, lists other channel-specific IDs; it is not a replacement for the room/rate comparison. A Send Mappings tab describes mappings prepared for a supported PMS connection, not proof that they were delivered.
Return to Channel Settings and reload it to display the saved mapping information. Reloading that page alone is not another channel retrieval.
2. Review mismatches and existing settings
Use Expand All and each room or rate plan's Additional Settings to review the affected sections.
- Check Channel Room Type ID, Channel Rate Plan ID and Standard Rate Plan Mapping, where shown.
- Read [NOT SETUP], [INVALID MAPPING], INVALID RATE PLAN MAPPINGS and any page-level warnings.
- A red [ X ] highlights a difference from available mapping information, such as Updating Enabled, occupancy or a supported feature. Compare the actual values and the intended setup before changing anything. Yes is not always the right correction.

No red [ X ] does not establish that everything is correct: checks depend on the channel's capabilities and the mapping data available. Confirm intended updating at the channel, room and rate-plan levels, including any deliberately disabled features or rate calculations. For a PMS connection, review the receive settings rather than assuming the OTA updating controls apply.
If an existing mapping has the wrong ID, correct it to the confirmed ID under the correct room type and save the settings. Do not add a duplicate or delete an otherwise needed plan merely to hide the warning.
3. Map missing rooms, then add the intended rate plans
Add Unmapped Room Types and Add Unmapped Rate Plans appear only when the available mappings and supported setup allow them. A missing link does not prove that the channel has no missing products.
Room types
- Open Add Unmapped Room Types when offered.
- For each ChannelRUSH room shown, select the corresponding channel room by name and ID. Leave rooms blank if they should not be mapped to this channel. Do not select the same channel room for multiple entries.
- Click Save when the choices are correct. This saves the room assignments and imports available room settings; it is not just a preview.
- Complete the rate-plan screen if it opens. Otherwise return to Channel Settings and check for Add Unmapped Rate Plans. If there is no suitable room entry or choice, resolve the room setup first rather than assigning an unrelated room.
Rate plans
UNMAPPED RATE PLANS means the available mapping list contains plans that are not configured under that channel room in ChannelRUSH. Add only those this connection should manage.
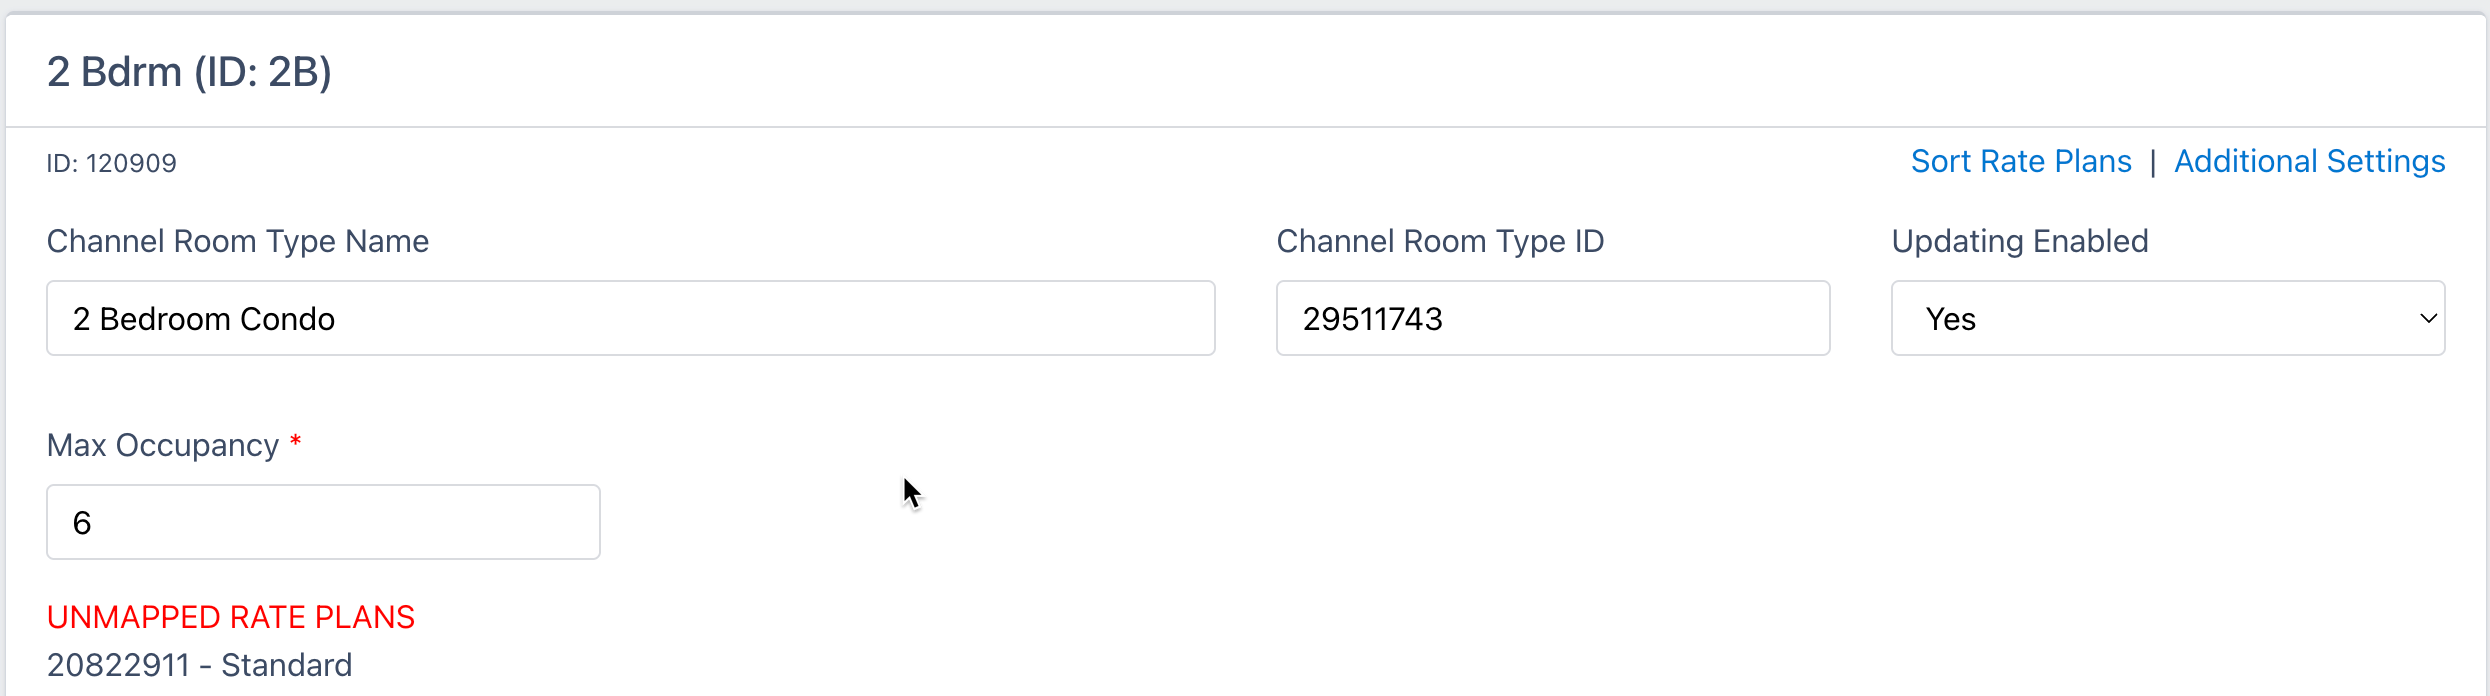
Open Add Unmapped Rate Plans above the room settings:

On the add screen:
- Check every room heading and Channel Rate Plan ID. The displayed plans are selected by default; uncheck any you do not want to add.
- Review Rate Plan Name and Updating Enabled for each selected plan. Do not enable updating solely because a plan appears in the list; respect the channel's update restrictions.
- Select the appropriate Standard Rate Plan Mapping, where offered, so the new plan uses the intended standard plan. Do not guess a correspondence from similar names.
- Click Save, then review the resulting Channel Settings and messages. Open the new plans' Additional Settings and apply any required custom settings from the replaced plans. Adding a plan does not automatically copy the old plan's custom calculations or disabled features.
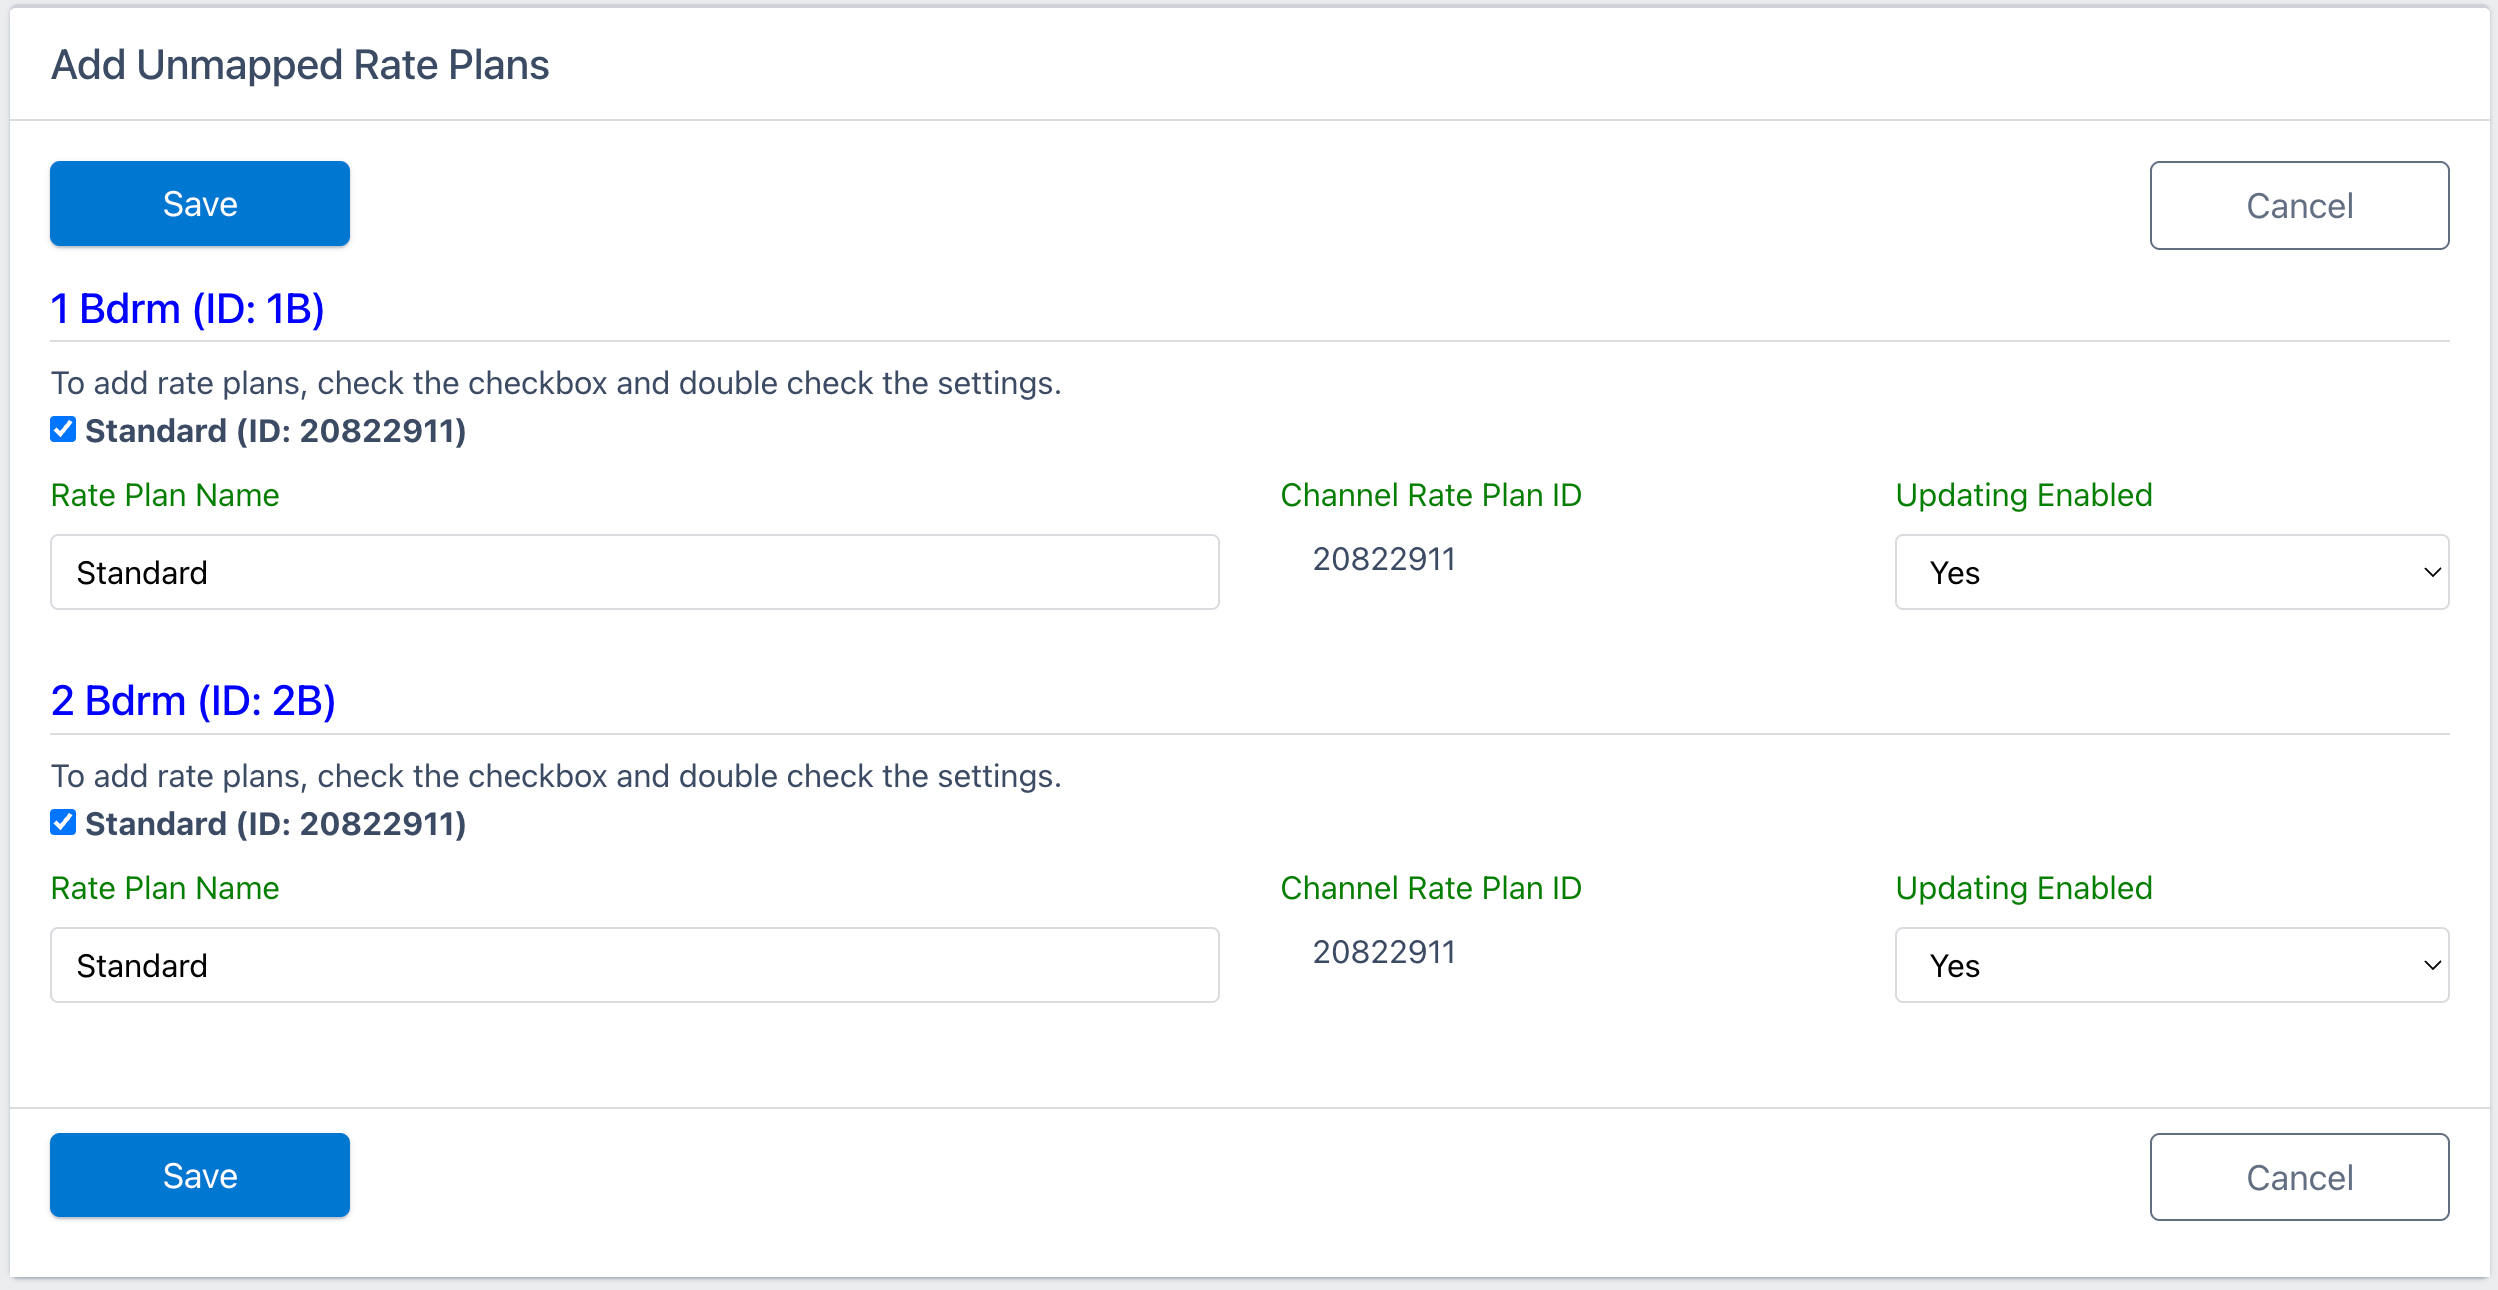
These additions use ChannelRUSH's saved mapping list; opening the add screen is not a fresh retrieval. If expected plans are absent, resolve the retrieval or room mapping first.
4. Remove only confirmed obsolete rate plans
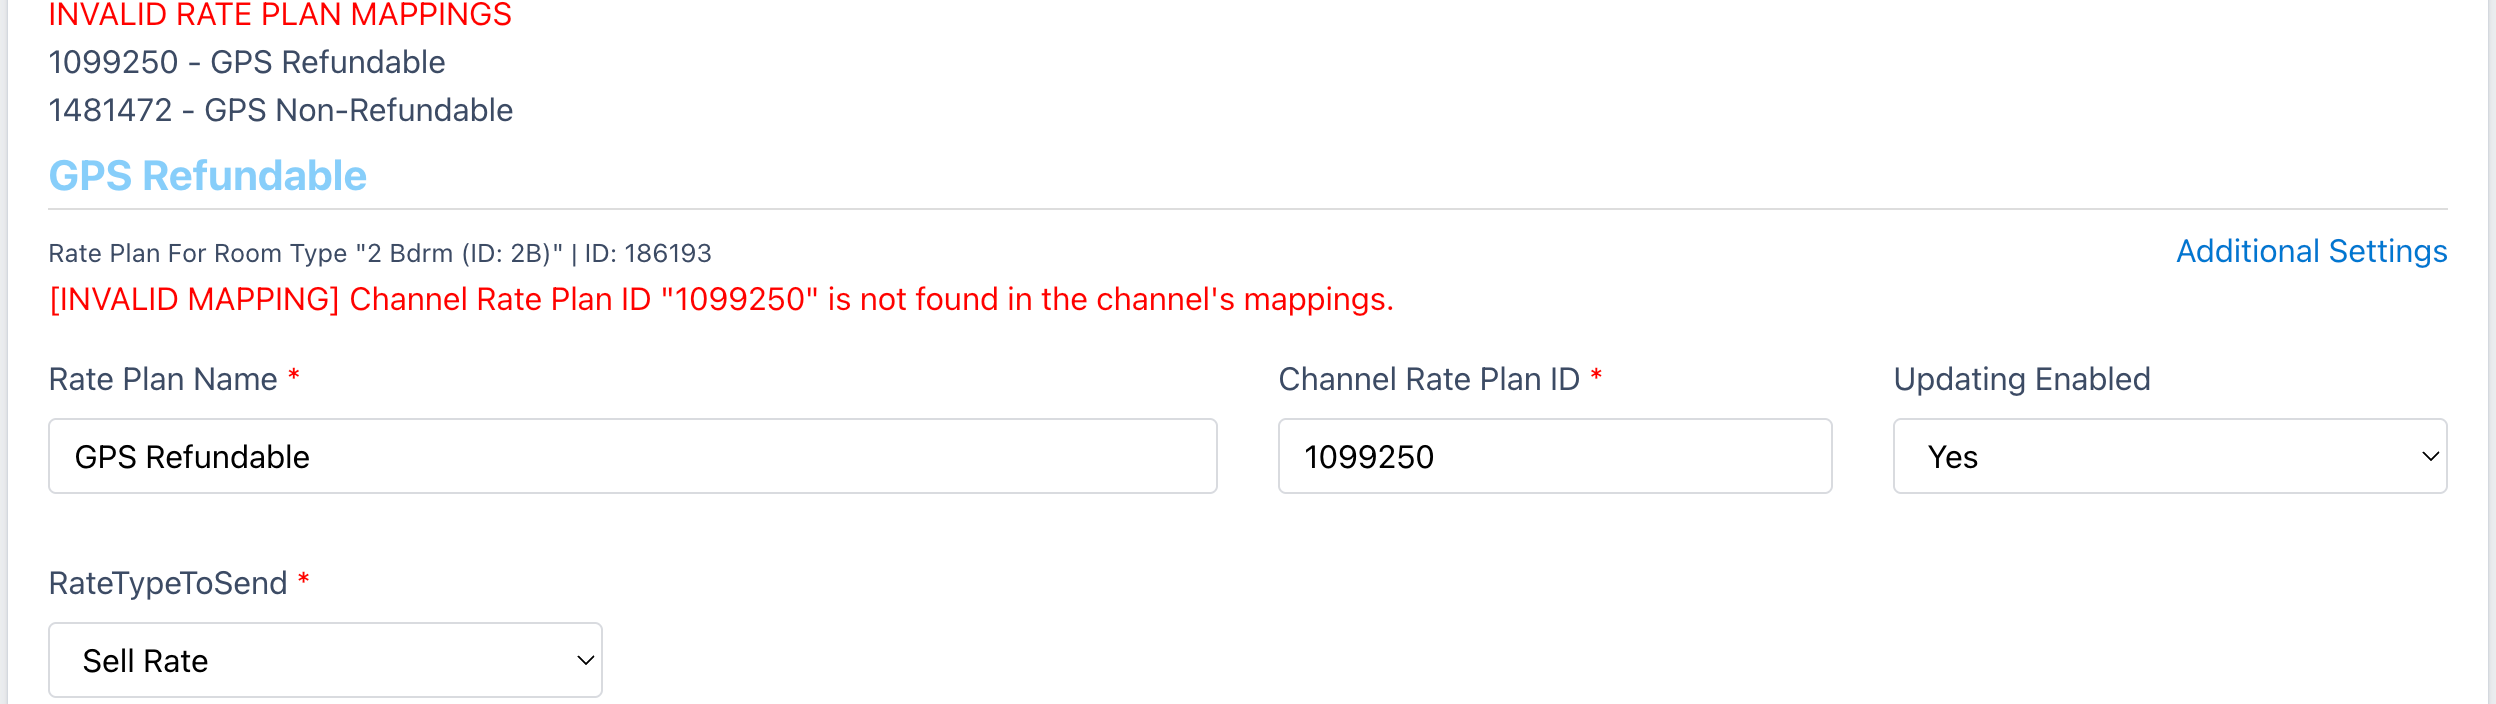
INVALID RATE PLAN MAPPINGS or [INVALID MAPPING] means the configured rate-plan ID was not found in the mapping information for that room. It does not, by itself, prove someone deleted the plan from the channel.
Before deleting, confirm that retrieval succeeded for the correct connection, the room ID is correct, and the plan is genuinely retired or replaced. If the plan still exists, correct the mapping or ask support to investigate. Record the old plan's standard-plan mapping, calculations, feature switches and other custom settings before removal.
Remove one plan
Open that rate plan's Additional Settings, scroll to Delete This Rate Plan, and follow the delete link. Check the room and plan on the confirmation page. Choose Delete only when this is the intended local plan; otherwise choose Cancel.
Remove several plans
- Open Delete Rate Plans above the room settings.

- Select only the plans you have confirmed should be removed. The list can include valid plans too; an [INVALID MAPPING] label is a prompt to investigate, not permission to delete. Room-level select-all controls select that room's plans, not just invalid ones.
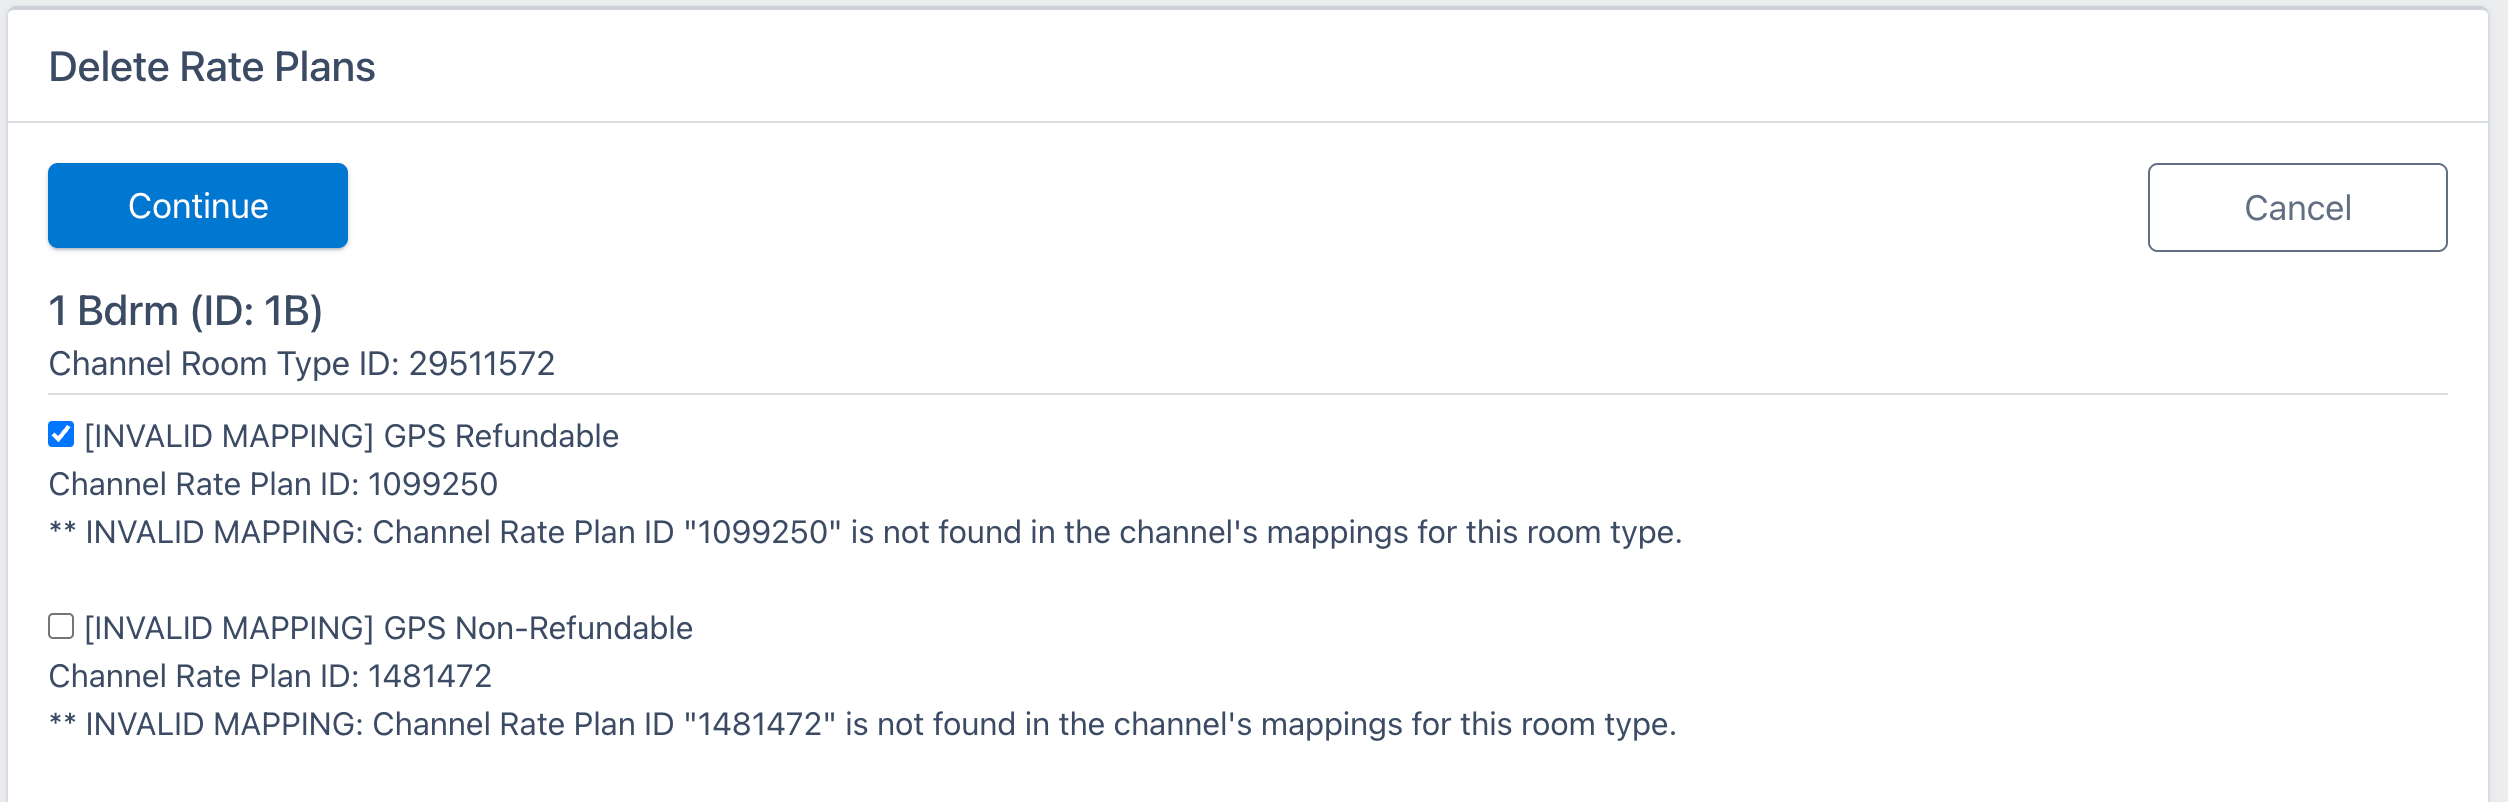
- Click Continue to review the selected plans. This step does not delete them.
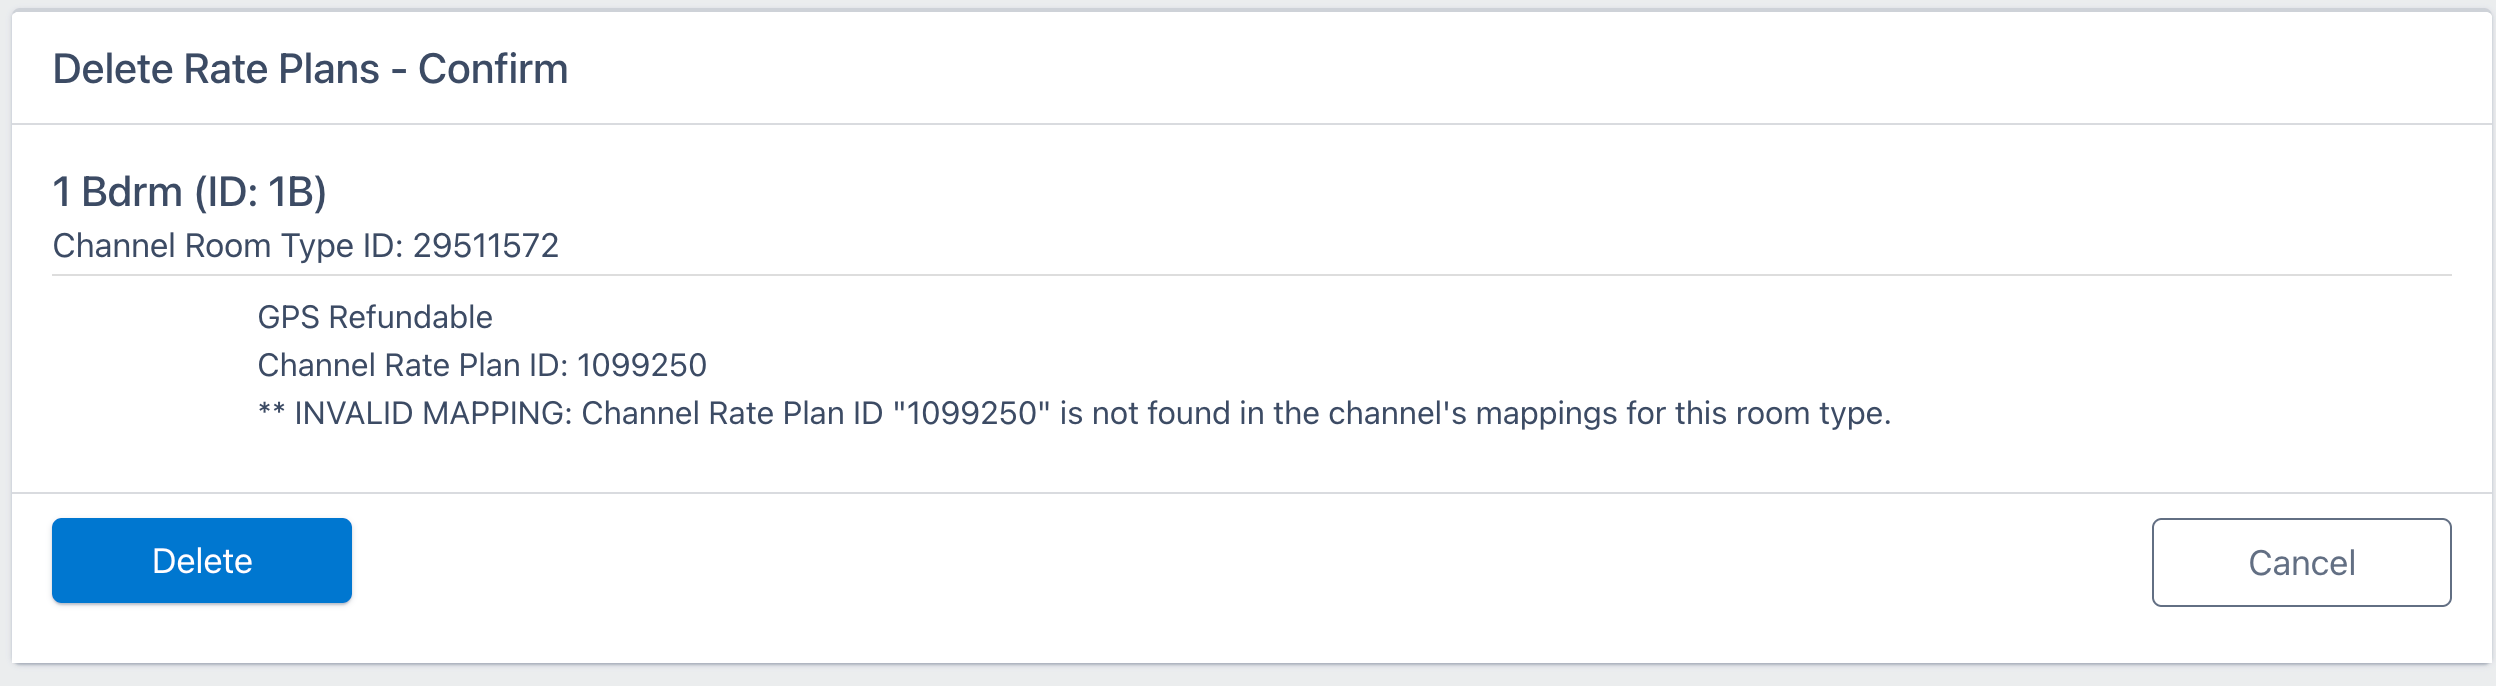
- Review every room/rate ID and any additional-settings warning. Go back to change the selection, or Cancel to leave without deleting. The final Delete button performs the deletion.
Understand the additional-settings warning
The warning identifies selected plans with certain disabled features or nonzero rate calculations that will be lost with the local plan. It is separate from an invalid-mapping warning and is not a complete inventory of every custom setting.
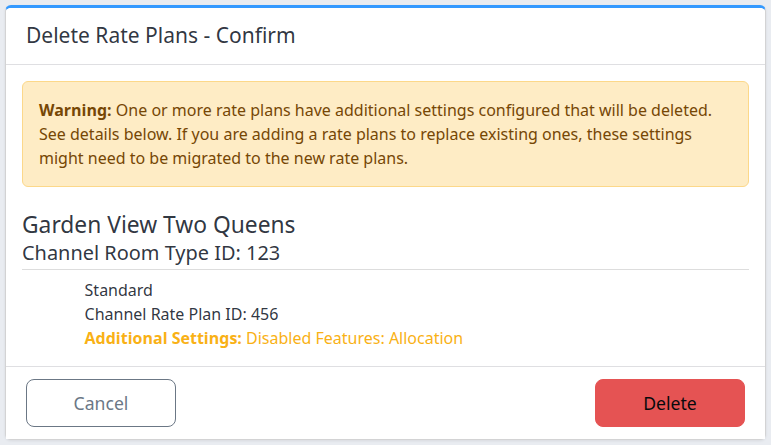
Existing demo warning example on Delete Rate Plans - Confirm. The plan is shown only to illustrate its additional settings; no deletion was performed.
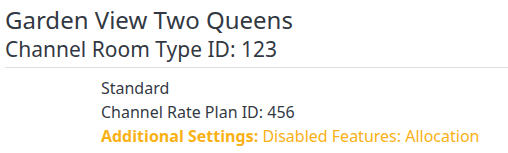
Detail from the same example: Allocation is disabled. A warning identifies settings to review; it does not by itself mean the mapping is invalid.
Review and record the required settings before proceeding, then deliberately apply them to any replacement. Do not assume that no warning means there is nothing to preserve.
Deletion removes the rate plan and its settings from this ChannelRUSH channel configuration. It is not an instruction to delete or close the plan in the channel extranet, and it is not an undoable hide action. Supported integrations may also send updated settings after the local deletion. Do not use deletion as a substitute for stopping sales on the channel.
5. Verify the result and handle errors
After each save, addition or deletion:
- Read all messages, not just the success message. Where offered, Save & Refresh saves changes and reloads the settings; it is not a read-only refresh.
- Reopen Channel Settings and check the actual saved IDs, room assignments, standard-plan mappings, update switches and custom settings. Confirm that intended additions are present and only intended deletions are absent.
- Review the mapping comparison again where supported, including retrieval errors and the detailed rows. A clean comparison is not proof of rate or availability delivery or of bookability on the channel.
A local save can succeed before a subsequent settings send fails. If you see a send error, a timeout or an uncertain result, check what is already saved before retrying. Do not repeat an add/delete operation blindly or assume an error rolled it back. Give ChannelRUSH support the property, channel, affected room/rate IDs and exact message—never passwords—and confirm the next step if the saved state or channel outcome remains unclear.