

Add up to ten standard rate plans to one property, check the saved names, and set any required rate-plan identifiers separately.
Before you start
- You need Org Admin access to the property.
- Check the property's existing Standard Rate Plans first. Reusing an existing plan is different from adding another plan with the same name.
- Have the names agreed with your team. For example, Flexible and Advance Purchase may be separate plans. Standard plans are property-level definitions; adding one does not create or map a plan on an OTA.
- New plans start with Updating Enabled and the three Parent Room Type Linked settings enabled. They start with no rate adjustments and an Auto Stop Sell Allocation Threshold of zero. Review these settings before using a new plan for inventory updates; creation is not a disabled draft stage.
Rate Plan ID limitation: the New Rate Plans form displays Rate Plan ID boxes, but its save operation does not use those entries. Leave them blank here. If an identifier is required, set it in Standard Rate Plan Edit after confirming the plan was created, using the steps below.
Properties using ChannelRUSH Master Image: saving new plans also refreshes that connection's setup. This refresh can clear stored master values for data types already disabled in its room or rate-plan settings. If you are unsure about those settings, ask support to review them before adding plans. Do not submit an empty batch as a test.
Open New Rate Plans
- Open Org Admin → Accounts.
- Locate the property under the correct organization.
- Click the property's name to open Property Edit.
- Check the property name and ID.
- Find Standard Rate Plans and review the existing list.
- Click Add New beside that section. Check the New Rate Plans heading and the property shown in the breadcrumb.
There are several Add New links on Property Edit. Use the one beside Standard Rate Plans, not the room-type or channel section.
Add the names
Typing in this form does not save a plan. Either Save button submits the whole batch.
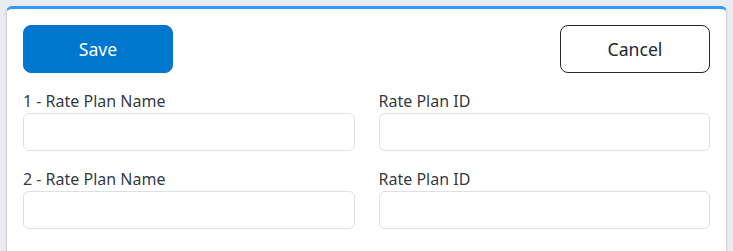
The first two rows of the ten-row form. Leave Rate Plan ID blank on this screen; set a required identifier after creation.
- Enter one plan name in 1 - Rate Plan Name.
- Enter each additional name in a separate numbered Rate Plan Name box, up to ten plans in this batch.
- Leave unused rows empty. Do not enter spaces as a placeholder.
- Leave the Rate Plan ID boxes blank.
- Check every entered name against the existing property list and the other names in this batch.
- Click Save once, at the top or bottom of the form.
Both Save buttons perform the same operation. A row with an empty name is skipped, even if its ID box contains text. Leading and trailing spaces are removed from names. Do not rely on this form to reject duplicate names or whitespace-only entries.
To leave without submitting, click Cancel. This returns to Property Edit without creating the unsaved names. Cancel is not an undo for an earlier Save.
Check the result
After a successful save, the application returns to Property Edit and displays a saved-settings message.
- Find Standard Rate Plans again.
- Check that each intended name appears once.
- Distinguish the numeric ID assigned by ChannelRUSH from the separate Rate Plan ID column. A numeric ID does not mean your own identifier was saved.
- Open each new plan's name to review its settings before using it for updates or channel mapping.
The list confirms that the standard plan exists in ChannelRUSH. It does not confirm that a channel has the plan, that its mappings are complete, that prices were sent, or that the channel accepted an update. Channel configuration and inventory delivery remain separate tasks.
For more than ten new plans, verify the first batch before opening Add New again. Enter only the remaining names.
If Save returns an error, times out or leaves you unsure of the outcome, do not immediately submit the same batch again. The plans can be saved before a later setup step fails. Reopen Property Edit and check the list first. If the outcome remains unclear, contact support rather than risking duplicate plans.
Set a required Rate Plan ID after creation
Use this procedure only after you have found the newly created plan in the property's list.
- On Property Edit, click the plan's name under Standard Rate Plans.
- Check the Standard Rate Plan Edit heading, property and plan name.
- Enter the agreed identifier in Rate Plan ID. Do not substitute an OTA's identifier unless your setup specifically requires it.
- Leave unrelated settings unchanged.
- If Re-Calculate Rates On Save is shown, select No for an identifier-only edit. The other choices can recalculate rates or recalculate and push them live to OTAs.
- Click Save.
- Back on Property Edit, check the plan's Rate Plan ID column. Reopen the plan if necessary to confirm the stored value.
Do not create the plan again to correct its identifier. If the identifier does not remain saved, stop and contact support with the property and plan details.
Field and control reference
| Field or control | What to enter or expect |
|---|---|
| 1–10 - Rate Plan Name | One name per row. Empty names are skipped; names are trimmed. Use a meaningful nonblank name, such as Flexible. This is a new standard plan, not a rename of an existing one. |
| Rate Plan ID | Leave blank on New Rate Plans: entries are not used by this form's save operation. Set a required identifier through the existing plan's edit screen instead. This is separate from ChannelRUSH's assigned numeric ID. |
| Save, top or bottom | Submits all populated-name rows together, saves the property and performs applicable master-image setup. It is not a preview or a channel-delivery confirmation. |
| Cancel, top or bottom | Returns to Property Edit without submitting this form. It cannot reverse plans already saved. |
| Property breadcrumb | Identifies the property receiving the new plans. Check it before entering names. |
The creation form does not expose pricing, inheritance, updating or calculation controls. Review those on each plan's edit screen after creation; do not assume that a name such as “Advance Purchase” creates pricing or booking restrictions by itself.
Common problems
Rate Plan ID is blank after adding a plan
The creation form does not use its ID boxes. Open the existing plan and follow Set a required Rate Plan ID after creation above. Do not add a duplicate. Contact support if the value still does not persist through the edit screen.
A row did not create a plan
A row without a name is skipped. Check the property list before trying again; an ID alone is not enough. If the name was present and the result is still unclear, provide support with the property ID, intended names, action time and time zone, and any error text.
A name appears more than once, or Save failed after submission
Repeated submissions can add the same names again. Stop adding plans and check the existing list. Ask support which records to retain before deleting anything, especially if a plan has already been mapped or used.
You cannot open the page or save
Check that you are in the correct organization and have Org Admin access to the property. The demonstration account does not allow this settings submission. For a normal account with the expected access, send support the page name and displayed error; do not send passwords.
The plan exists here but not on a channel
A standard plan is not a completed channel setup. Check the channel's own rate plans and standard-plan mapping. Do not resend inventory merely to make a missing mapping appear. If you are unsure which channel plan should be matched, contact support before changing it.