

Use a CSV file to update rates, availability and restrictions across dates, room types, rate plans and authorized properties. Download an empty template, fill in your changes, validate the file, then submit it for background processing.
Upload & Validate does not apply inventory changes. Process does. Processing can update master inventory, store manual overrides for incoming PMS inventory where enabled, and create outbound channel updates. Import completion is not confirmation that a channel accepted the changes.
Before you start
- Select the property in the application's property selector. Open Admin, find the Channel Manager section, then choose Bulk Inventory Import.
- Use ChannelRUSH property, room-type, rate-plan and channel IDs—not names or external channel room codes. Your file can include more than one property, but you must have access to every property you intend to update. Authorized distributor users can include properties in their managed active child organizations.
- Confirm the destination channels and product mappings are set up for inventory sending. Channel capabilities and settings determine which values can be applied.
- Keep a copy of the intended values and the CSV you submit. There is no automatic undo.
Your account needs the permissions for every update type in a row:
| CSV values supplied | Required permission |
|---|---|
Rate |
Update - Rates |
Allocation or StopSell |
Update - Availability |
CTA, CTD, MinNights, MinNightsThrough, MaxNights, MaxNightsThrough or CutOffDays |
Update - Restrictions |
A row containing several update types needs each corresponding permission. A missing permission makes the row invalid; the importer does not strip out only the unauthorized field. Update Close-Outs alone is not sufficient for StopSell in this importer. Ask your administrator to review access rather than changing IDs or using a broader update to work around a restriction.
1. Download a template and find your IDs
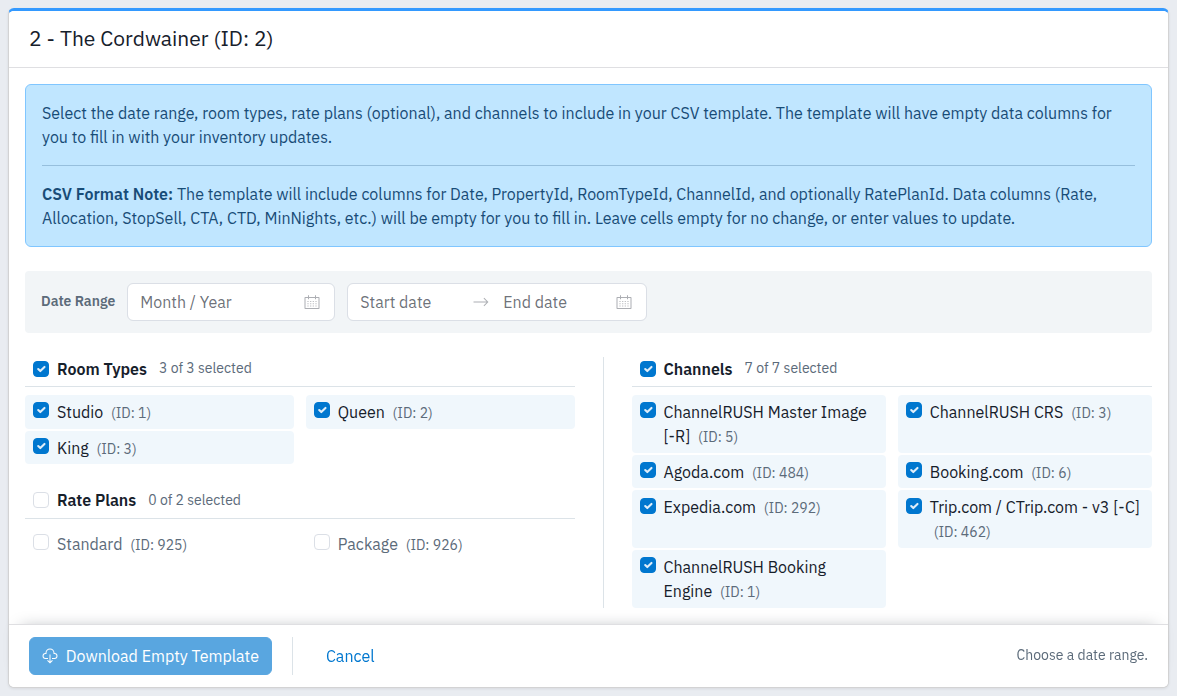
Default selections before choosing dates. The on-screen “empty for no change” note means no explicit field value is supplied; configured rules can still derive related changes, as explained below.
- On Bulk Inventory Import, click Bulk Inventory Import Template in the Upload CSV File heading.
- Check the property name and ID at the top. The template is for this property only.
- Choose a Date Range, using the month picker or date-range control. Both endpoints are included. Choose dates from the property's today onward, with no more than 1,095 dates in one template. Import validation separately requires every date to be no later than the property's today plus 1,095 days.
- Select the Room Types to include. All are selected initially; at least one is required.
- Select Rate Plans, if needed. None are selected initially. No selection omits the
RatePlanIdcolumn and creates room-level rows. Selecting plans creates rows for each selected room/plan combination, without additional room-only rows. - Select Channels. All offered channels are selected initially. Use the checkbox beside each group heading to select or clear that group, then choose individual entries. The selection counts and summary help you check the scope.
- Click Download Empty Template.
The CSV contains dates and IDs, with empty update cells. It is not an export or backup of your current rates, availability or restrictions. A template combination does not establish that the selected room and rate plan have an enabled mapping on every channel. Narrow or split large templates to stay within the import limits below.
All channels versus named channels
- When every offered channel is selected, the template uses
ChannelId = 0: one all-channel row per date and room/plan combination, not separate rows for each named channel. - When you select only a subset, the template creates rows with those specific channel IDs.
0uses the property's eligible inventory-send channels when the import is processed. It is not a frozen list from the day you downloaded the template. If you need a fixed set of destinations, use explicit channel IDs in the CSV.- A property with no eligible inventory-send channel cannot process an all-channel row, even if a template can be downloaded.
Room-level does not mean rate plans are untouched. Room-level inputs can also apply to enabled mapped rate plans and virtual room types through your channel setup. To target a particular standard rate plan, use its positive RatePlanId and check its channel mappings.
ID Reference Download
Use the separate ID Reference Download section when building or checking your file:
- This Property downloads IDs for the selected property.
- All My Properties downloads IDs for your assigned active properties.
These downloads are Excel workbooks (.xlsx) with Properties, Room Types, Rate Plans when applicable, and Channels sheets. The Channels sheet includes 0 for all channels and the inventory-send channels represented in the workbook. A channel listed in a multi-property reference is not necessarily configured on every property.
Use the workbook as a reference; do not upload it as an import. For a multi-property CSV, use each property's matching room and rate-plan IDs.
2. Fill in the CSV
Open the template in your spreadsheet application, or create a file using the column reference below. Enter only the changes you intend to submit.
File and formatting rules
- Save as a comma-separated text CSV (.csv), preferably UTF-8. Renaming an Excel workbook to
.csvdoes not convert it. Semicolon-separated files are not the required format. - Put the header on the first line and each record on its own line. Do not put line breaks inside cells. Quoted cells and doubled quotes within quoted cells are supported on a single line.
- Header names are case-insensitive and surrounding spaces are ignored. Columns can be reordered. Keep each header unique.
- Include
Date,PropertyId,RoomTypeIdandChannelId. Optional columns can be omitted when not needed. - Keep comma separators for blank cells so later values stay under the correct header. Do not use
null, dashes or other placeholders for an empty value. - Use a decimal point for rates, without currency symbols or thousands separators. Use whole numbers for IDs, allocation and numeric restrictions.
- Maximum upload: 10 MB (10,485,760 bytes) and 100,000 parsed data rows. The header, blank lines and rows containing only empty cells are not counted as data rows.
Blank, zero and false are different
A blank update cell means you are not explicitly submitting that field. It does not clear an existing value. 0 and false are explicit values, not blanks.
Configured inventory rules can still derive related changes. In particular, when Auto Stop Sell = NO When Allocation > 0 is enabled and you leave StopSell blank, a positive allocation can reopen a previously closed date; an allocation of 0 can set Stop Sell to Yes. Review both availability and Stop Sell before submitting an allocation-only file. Other channel rules can adjust rates, supply defaults or translate unsupported restrictions into a close-out.
CSV column reference
All update columns are optional. A row needs at least one update value to be processed.
| Column | What to enter and what it means |
|---|---|
Date Required |
Inventory date in exact YYYY-MM-DD format. It must be between the property's local today and today plus 1,095 days, inclusive. Use the property's time zone, which may differ from yours. |
PropertyId Required |
Positive ChannelRUSH property ID for an authorized property. |
RoomTypeId Required |
Positive standard room-type ID belonging to that property. |
RatePlanId |
Positive standard rate-plan ID belonging to that property. Leave blank or omit the column for room-level input. Do not use 0 or a negative ID as a substitute for blank. |
ChannelId Required |
0 for all eligible inventory-send channels, or a positive channel ID configured and enabled for inventory sending on that property. Blank is invalid. |
Rate |
Sell rate, such as 199.99. Must be greater than zero. 0 does not remove a rate. Configured channel calculations can change the outbound amount. |
Allocation |
Number of rooms available, from 0 to 32767. 0 explicitly submits no availability; a positive number submits availability. See the Stop Sell interaction above. |
StopSell |
true closes sales; false requests removal of Stop Sell. Reopening does not supply missing rates or availability, or remove other restrictions. |
CTA |
Closed to Arrival: true prevents a stay starting on this date; false removes this arrival closure. |
CTD |
Closed to Departure: true prevents a stay departing on this date; false removes this departure closure. |
MinNights |
Minimum length of stay for arrivals on this date. Use 1 to remove a multi-night minimum. The importer accepts 0, but outgoing update requests normalize it to 1. |
MinNightsThrough |
Minimum total length of stay for stays including this date. Use 1 to remove a multi-night through-stay minimum. An imported 0 is normalized to 1 in outgoing update requests. |
MaxNights |
Maximum length of stay for arrivals on this date. 0 requests removal of the maximum-stay limit. |
MaxNightsThrough |
Maximum total length of stay for stays including this date. 0 requests removal of the through-stay maximum. |
CutOffDays |
Minimum advance-booking interval in days before the inventory date. 0 requests no advance-day cutoff. |
For StopSell, CTA and CTD, accepted values are true/false, 1/0 or yes/no, in any letter case.
For MinNights, MinNightsThrough, MaxNights, MaxNightsThrough and CutOffDays, accepted CSV values are whole numbers from 0 to 32767. Negative values are invalid. When both fields are supplied in a row, MinNights must not exceed MaxNights, and MinNightsThrough must not exceed MaxNightsThrough. This comparison also applies when the maximum is 0; do not pair a positive minimum with a zero maximum in the same row.
These are import rules, not a promise that every destination supports every field or accepts the full numeric range. Restriction removal is an explicit update, subject to the destination's supported fields and mappings; a blank cell does not request removal.
Illustrative example—not a captured upload
The property and room IDs below are illustrative. Replace both IDs with your own, and replace every date with an intended property-local date within the allowed import window. ChannelId = 0 deliberately targets all eligible channels; replace it with a specific channel ID if that is not your intention.
Date,PropertyId,RoomTypeId,ChannelId,Rate,Allocation,StopSell,CTA,CTD,MinNights
2027-01-15,10001,20001,0,199.99,10,false,false,false,2
2027-01-16,10001,20001,0,219.99,10,false,false,false,2
2027-01-17,10001,20001,0,249.99,5,false,false,false,3
2027-01-18,10001,20001,0,,0,true,,,
The first three rows submit rates, allocation, open-sales/arrival/departure values and minimum nights. The last row submits zero allocation and Stop Sell only; its blank rate and restriction cells do not explicitly replace those fields. All rows are room-level because the example has no RatePlanId column.
3. Upload and review
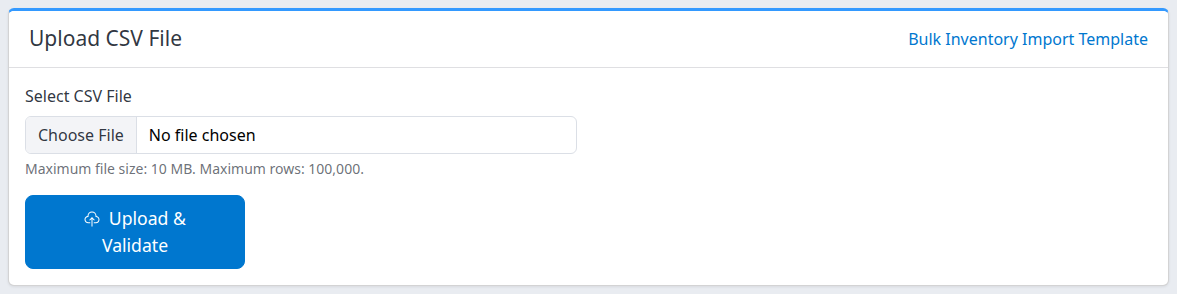
- Return to Bulk Inventory Import.
- Under Select CSV File, choose your completed CSV.
- Click Upload & Validate.
- On Review Import, confirm the file name and each property's name and ID. Multi-property files also show an overall summary.
- Check Total Rows, Valid rows to process, Skipped (empty data) and Errors for each property.
- Read header warnings and the row error list. Correct the original CSV before proceeding if its scope or values are not what you intended.
How to interpret the preview:
- Valid rows passed the current checks and contain at least one update value. Validation does not prove that a channel mapping will create an update or that a channel will accept it.
- Skipped (empty data) means a row passed validation but all its update fields are empty. Invalid IDs or dates still cause an error even if the update cells are empty.
- Errors counts rows with errors, not individual messages. A row can have several messages. Row numbers refer to physical file lines, including the header as line 1. The preview displays at most 500 error messages; fix all affected rows and validate again rather than relying only on the visible list.
- Duplicate Column Headers Detected - Cannot Process blocks the normal Process control, even if there are otherwise valid rows. Keep one header for each field and one room type per record.
- Unrecognized Columns Detected lists ignored columns. A misspelled update header may cause intended changes to be ignored; correct it rather than dismissing the message.
- If there are no processable rows, use Try Again. Otherwise, use Cancel to return without submitting the preview, edit your CSV and upload it again.
The preview expires after 30 minutes. If it expires, upload and validate again. Editing the local file after validation does not change the uploaded preview.
4. Submit the import and check its progress
- When the file and scope are correct, click Process [number] Valid Rows once. This submits real inventory changes for background processing.
- On Background Import Started, record the Request ID, file name and preliminary counts.
- Click Go To Status Page to open Import History. You do not need to keep the confirmation page open.
- Find the job by ID and file name. Reload or search again to check its status; the confirmation page's Pending badge is not a live progress indicator.
The entire original file is checked again when processing starts. Dates, permissions, property access and channel setup may have changed since preview, so final counts can differ. Rows that were invalid in the preview are not permanently excluded if they become valid later. If you want to exclude a row, remove it from the CSV and validate the revised file before clicking Process.
Processing can skip properties where updates are not allowed, such as locked or inactive accounts. Eligible rows can produce no channel requests when mappings or supported-field settings prevent them. Some changes can be saved before a later failure; Failed does not mean nothing changed.
A completion email is sent to the uploader's recorded email address when available. Use Import History to check the result even if the email does not arrive. Missing email alone is not a reason to re-upload.
5. Use Import History
Import History lists submitted jobs, not files that were only previewed. It is not restricted to the currently selected property: it uses the applicable organization context and your uploader visibility. Most users see their own uploads; organization administrators and users with broader portfolio access can see other uploaders' jobs.
- Select Status or leave All.
- Select Uploaded By if you need to narrow the uploader.
- Set Created Date Range if needed. This filters job creation using UTC day boundaries, not the property-local inventory dates inside the CSV.
- Click Search. Use Clear to remove the filters.
- Use the paging arrows to browse results, 25 jobs per page. If nothing matches, clear or widen the filters before assuming a job is missing. Widen the creation range around a date boundary if necessary.
Each entry shows:
| History item | Meaning |
|---|---|
| ID | Bulk import job ID. Keep it for investigation; it is not an outbound channel request ID. |
| File Name | Opens Bulk Import File View in a new tab. The entry also shows the uploader and a property name or property count when available. |
| Status | Import-processing state, described below. |
| Rows | Processed Rows / Total Rows, not a channel-delivery fraction. These counts are not a live per-row progress meter. |
| Requests | Requests counted during import generation/saving. A dash can appear while pending or processing; a finished job can show 0. It is not a count of channel-accepted days. |
| Timestamps | Created, Processing start and Completed when recorded. Completion can include a failed outcome. |
| Result/error text | Stored processing summary. Long error text is shortened in the list; open the file view for the stored detail. |
Import statuses
| Status | Meaning and next step |
|---|---|
| Pending | Submitted and waiting for background processing. Do not submit another copy merely because it has not started. |
| Processing | Import processing has started. Check again before deciding on a correction. |
| Completed | Import processing finished without recorded validation errors or skipped-property warnings. It does not establish channel acceptance or guarantee that every row produced a request. |
| Completed with Errors | Processing finished with validation errors or skipped properties. Read the result and errors before preparing a correction. |
| Failed | Processing could not finish, or no valid rows remained. Inspect the error and any already-applied changes before retrying. |
| Timed Out badge | A job is still marked Processing more than 30 minutes after its recorded start. It may subsequently be marked Failed. This is not proof of rollback or permission to submit a duplicate. |
There is no cancel, retry or undo action for submitted jobs on this page. The preview's Cancel only leaves the preview; it does not cancel an already submitted job.
6. Inspect the original file and processing summary
In Import History, click the file name. Keep the history tab open: Bulk Import File View opens separately without the main navigation.
Original upload
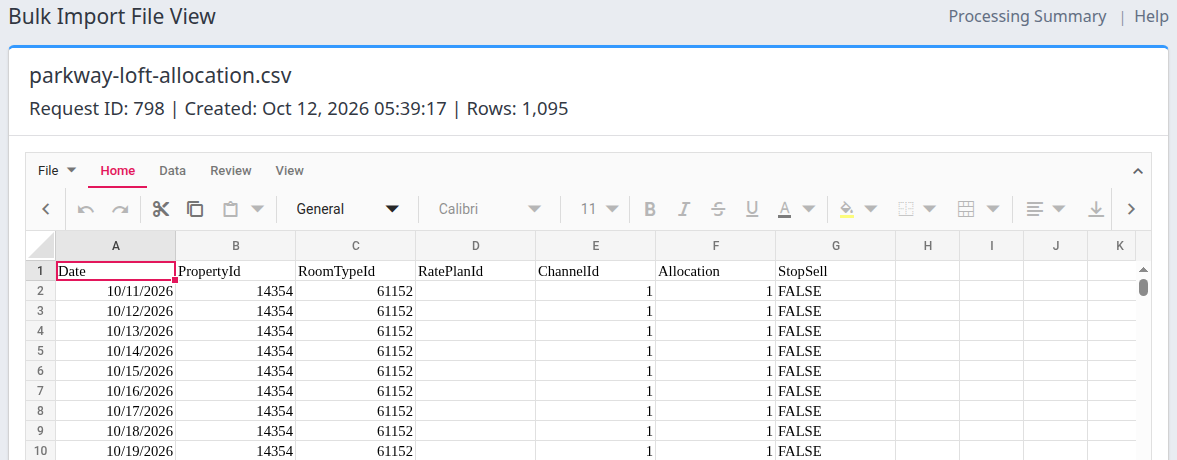
Top excerpt of an existing demo file, not current channel inventory. The viewer may display dates in a spreadsheet format such as M/D/YYYY; an import CSV still requires YYYY-MM-DD.
Confirm the file name, Request ID, Created timestamp and Rows at the top. The Import Data spreadsheet displays the stored original upload, including rows that failed validation. It is not a successful-row report or a fresh view of current channel inventory. The spreadsheet can include empty CSV records excluded from the parsed total, so the records displayed in the grid may not match the Rows count shown above it.
The spreadsheet is read-only. You can resize columns to read values, but cannot edit cells or open another file in it. File → Save As downloads a spreadsheet copy; the file name is prefilled from the upload. File → Print prints the displayed spreadsheet. Neither action submits inventory, repairs the import or undoes changes. Handle downloaded or printed files according to your organization's data-sharing rules, especially for multi-property uploads.
If File content not available appears, check the summary and errors below. Missing grid content does not establish that the import never ran.
Processing Summary
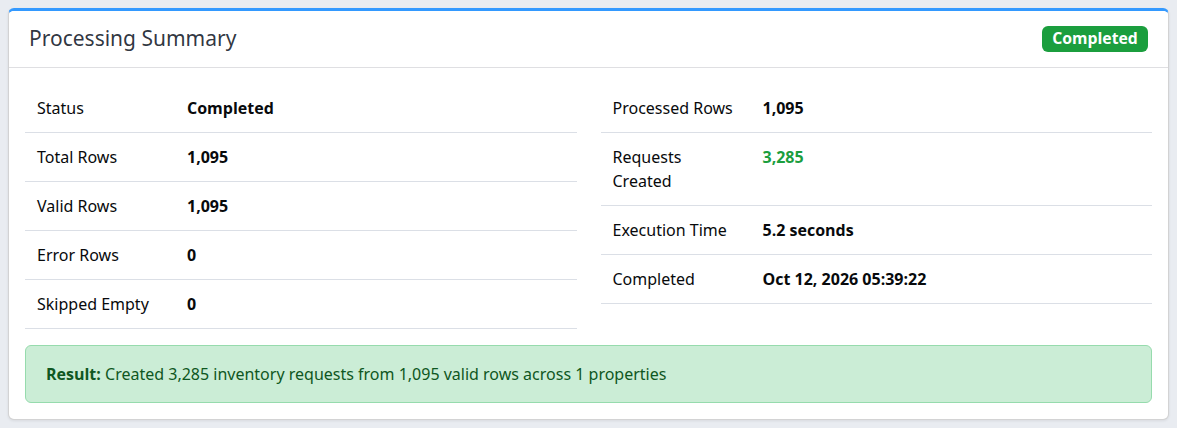
Completed describes import processing—not channel acceptance.
Use the Processing Summary jump link or scroll below the spreadsheet. Reload the page to obtain a newer snapshot.
| Field | Meaning |
|---|---|
| Status | The import job's state, not the destination channel's result. |
| Total Rows | Parsed data records, excluding the header and entirely empty records. |
| Valid Rows | Rows with update data that passed validation. Pending values are preliminary; background processing recalculates them. |
| Error Rows | Records that failed validation, not the number of error messages. |
| Skipped Empty | Valid-identity/date records without update values. |
| Processed Rows | At normal completion, the revalidated row count passed into processing. It can include rows for a property subsequently skipped; it is not a count of successful saves or deliveries. |
| Requests Created | Generation/save-stage request count. It can be zero, and it need not equal the row count. It does not count accepted channel dates. |
| Execution Time | Recorded elapsed processing time, when available. |
| Completed | Recorded job completion timestamp, when available—not channel acceptance time. |
| Result | Additional outcome text, when available. Read it even if the counts look satisfactory. |
Processing Errors
When an error summary exists, Processing Errors appears below the summary with a jump link at the top. This is the full stored summary, not necessarily every error in the original file: background validation retains at most 100 validation messages, and a processing failure may show a general error instead. Scroll within the error area to read it.
Correct files outside the viewer. Saving a spreadsheet copy does not change the original submitted job. Save As creates a generated spreadsheet copy, not a byte-for-byte download of the original CSV. Dates may be reformatted in the viewer or downloaded copy. Before reusing a copy for import, save it as CSV and check that every Date value is exactly YYYY-MM-DD. Prefer editing your retained original CSV.
7. Verify channel updates and recover safely
After checking the import result:
- Select an affected property and open Updates → Status.
- Select the relevant Channel, room type or rate plan, and Source: UI Bulk Import. Use Status: All when following an update through different states.
- Click Search, then inspect the relevant dates, values, status and available messages or logs. Do not enter the bulk import job ID as an outbound Request ID.
- Repeat for other affected properties and destinations. Check the destination channel's product and dates when you need confirmation of its current inventory.
Import History answers “Did the import finish processing?” Update Status answers “What happened to the outbound updates?” Neither the import's Completed badge nor its Requests Created count replaces the second check.
| Problem | Safe next action |
|---|---|
| File rejected, parse errors or shifted columns | Export a real text CSV, check comma separators, header spelling, dates and numeric formats, then validate again. Split files exceeding the byte or row limit. |
| Invalid property/product/channel or permission error | Check the ID reference and the property's enabled mappings. Ask your administrator to correct access or setup where necessary; do not substitute unrelated IDs. |
| Session expired. Please upload the file again. | A preview may have expired or already been used. If you clicked Process or its response was uncertain, first search Import History for the job. Re-upload only after establishing that a new submission is needed. |
| No email, Pending/Processing does not advance, or Timed Out | Search/reload history and inspect the job. If it remains unresolved, contact support with the job ID rather than repeatedly uploading. |
| Completed but zero requests, missing changes, or unexpected values | Read Result and Processing Errors, then check mappings, channel field support, configured calculations and outbound status. Do not assume zero requests means master inventory was unchanged. |
| Completed with Errors or Failed | Compare the original CSV, stored outcome, current inventory and outbound updates. Some changes may already have applied. Prepare only the corrections still needed. |
| Wrong values were processed | There is no automatic undo. Establish the correct current values, then submit a deliberately scoped corrective import or use the appropriate update screen. Re-importing an old file can overwrite newer changes. |
For support, provide the import Request ID, file name, affected property/channel/product IDs, inventory dates, action time and time zone, and the relevant error text. Share only the necessary file excerpts; no passwords or unrelated guest information are needed.